 Carnegie Mellon Unversity
Intelligent
Software Agents Lab
RETSINA
AFC
Developers’ Guide
Volume 1.0 rev 15
Carnegie Mellon Unversity
Intelligent
Software Agents Lab
RETSINA
AFC
Developers’ Guide
Volume 1.0 rev 15
Inteligent
software Agents LAB
RETSINA AFC Developers'
Guide
ã 2002
The
Intelligent Software Agents Lab
Katia
Sycara
Primary
AFC Developer: Martin van Velsen
Editor:
Michael Rectenwald
The
Robotics Institute
Carnegie
Mellon University
5000
Forbes Ave
Pittsburgh, PA 15213-3890
T A B L E o f C o n t e n t s
PART I: INTRODUCTION
System and Software Requirements
Installation
Instructions
General
Running Instructions: Running An Agent
PART II: EXAMPLES
Example One: Agent Communications
Building The First Example Agents
Example Two: Adding An Information Agent
Building The Second Example Agents
Example Three: Using the Matchmaker
Building the Third Example Agents
Testing the Fourth Example Agents
Example
Five: Integrating Third-Party Reasoning Modules
Example
Seven: Distributing Your Agents Over a Number of
Machines
PART III: AGENT ATTRIBUTES AND CONVENTIONS
Commandline Parameter Handling
Network BeliefDB Data Structures
Processing Updates to the Agent Environment
Working with Top-Level Agent States
Agent User Behavior, Agent Naming Convention
PART IV: VISUALIZATION TOOLS
PART V: DATA STUCTURES, TOOLS, UTILITIES
File and Directory Access Tools
Database File Access
Wildcard
Matching Support
Adding Custom Sockets to Your Agent
Creating Unique ‘reply-with’ Fields
APPENDICES
A: Comparison of Agent Building Systems
B: The RETSINA Software License Agreement
Agent
technology promises to revolutionize the World Wide Web and a range of other
domains.[1]The prospects for the development of artificial intelligence are only now
beginning to be glimpsed. From information agents searching the web, to a new
kind of travel agent helping drivers/travelers navigate traffic and busy
schedules, to stock agents aiding in the management of user portfolios, to
agents joining forces in the defense against terrorism, the ubiquitous use of
agent technology is beginning to see the light of dawn.[2]
Despite
the heralding of a new age of computing and integration of artificial
intelligence into everyday life, there has been very little distribution and
implementation of agent technology on a routine basis.[3]
Given
the widening gap between promises of widespread use and actual availability, we
at the Intelligent Software Agents Lab wanted to develop a
means by which agent technology could be made accessible, both physically and
technically, to expert agent developers/programmers, as well as early,
non-expert adopters of agent technology. We wanted to produce a package
that would allow comparatively easy building, testing and interacting with
agents and communities, while also allowing expert developers to experiment
with complex agent configurations.
Furthermore,
and admittedly as a means for promotion of our own research and development, we
wanted this distribution to be based on the RETSINA model of agent community
architectures. We feel that the RETSINA system merits this promotion and
distribution, given its advanced development and the demonstrably sound
principles on which it has been based (see below). This RETSINA Agent
Foundation Classes (AFC) kit is the result of the RETSINA research vision and
the need for an Agent Building kit that meets the demands for relatively wide
distribution and easy assembly and use of agent technology.
While
the RETSINA vision for agents and agent communities is described in detail in
our academic publications,[4]a brief overview of this vision is in order here.
Since
the inception of agent research, we have acknowledged that while agents of any
complexity could theoretically be developed, their actual use would always
depend on their functioning within a community of other agents and software
infrastructure. That is, we assumed from the outset that agents are social,
that other agents were often different than themselves, and that agents should
be free to join and leave communities “at will.” Given these and other
conditions, agents should nevertheless be able to find and communicate with
each other. It was under these assumptions that we developed the RETSINA
Multi-Agent Infrastructure (MAS). This infrastructure would not impose
constraints upon individual agent design. It would not limit agents to one
language. It would not require a centralized system of registration and
communication. It would support the ongoing introduction of new agent types and
services.
As
one can see, these acknowledged conditions begin to suggest requirements for an
MAS. To meet these requirements, we developed a communications language that
would allow different types of agents to talk, despite speaking different
languages (LARKS). We developed a “white pages” directory that allowed agents
to have names and addresses available to each other and to infrastructure
components (Agent Name Server or ANS). We developed a “yellow pages” that
allowed agents to locate other agents who fit descriptions of service providers
they needed (Matchmaker). We developed a means by which agents who had little
or no knowledge of each other could find each other in either Local Area
Networks (LAN) or Wide Area Networks (WAN). This means is known as Discovery.
Finally, we have demonstrated the interoperability of disparate agent
communities by means of an “Interoperator,” a translation agent who can mediate
between heterogeneous MASs.
This
kit represents the first release of RETSINA MAS agents and infrastructure to a
wider public. While the entire capability of our agents cannot be included
here, we have provided the main components of our agents and their
infrastructure support, as well as the libraries for the more complex agent
development. We invite you to test the agents provided, to build your own
agents and agent communities, and to provide feedback to our researchers and
developers.
For
more detailed information about the RETSINA MAS Infrastructure, please visit
our website at http://www.cs.cmu.edu/~softagents
PART I: OVERVIEW, System
REquirements AND INSTALLATION
Before you begin with the installation and use of the
RETSINA agent libraries and Developers’ kit, you should have some understanding
of the agents you will use and build, and their relationship to the agent
system where they will live. Here, we will introduce you to the agent types and
classes on which the AFC is based, and the RETSINA MAS to which they contribute
and from which they derive their design parameters.
The advantages of this agent-builder kit are those derived
from the RETSINA MAS itself (see Introduction). Using the AFC, you will be able
to build agents that can
1. Interoperate
with each other, and other, heterogeneous agent types and systems;
2. Advertise
their services and capabilities, and find agents whose capabilities they seek,
using the RETSINA Matchmaker;
3. Find and
communicate with each other across distributed systems, on a peer-to-peer
basis;
4. Link to a
planning or reasoning component that controls the activities of the agent.
In this Guide, we will illustrate each of the features of
the system, by means of examples. After most of the examples, we give
step-by-step instructions on how to build them. The developer can then go on to
build other agents and agent interactions.
RETSINA Agent Types
In the RETSINA MAS, there are four primary agent types:
Information Agents, Task Agents, Interface Agents and Middle Agents.
Interface Agents interact with users, receive user input,
and display results to users.
Task Agents help users perform tasks. They formulate
problem-solving plans and carry out these plans by coordinating and exchanging
information with other software agents.
Information Agents provide intelligent access to a
heterogeneous collection of information sources
Middle Agents help match agents that request services
with agents that provide services.
We discuss these agent types, their uses and construction, in the course
of this Developers’ Guide.
In addition to
these agent types, the RETSINA MAS Infrastructure includes the Agent Name
Service (ANS) server. The RETSINA
ANS server acts as a registry or "white pages" of agents, storing
agent names, host machines, and port numbers in its cache. The ANS server helps
to manage inter-agent communication by providing a mechanism for locating
agents.
When an agent becomes active
and an ANS server is available, the agent registers with an ANS server by
providing its name, host name, and port number. An ANS server keeps a list of
agent locations, so that, should agents relocate to different host machines,
other agents will still be able to find them. Agents locate other agents by
querying ANS servers that store the location data of the agents that they wish
to find. The means by which agents locate ANS servers and each other has been
radically revised by the addition of Discovery.
The RETSINA MAS Infrastructure includes the Matchmaker. The Matchmaker helps make connections between agents that request services and agents that provide services. The Matchmaker serves as a "yellow pages" of agent capabilities, matching service providers with service requestors based on agent capability descriptions. The Matchmaker system allows agents to find each other by providing a mechanism for registering each agent's capabilities. An agent's registration information is stored as an "advertisement," which provides a short description of the agent, a sample query, input and output parameter declarations, and other constraints.
When the Matchmaker agent receives a query from a user or another software agent, it searches its dynamic database of "advertisements" for a registered agent that can fulfill the incoming request. The Matchmaker thus serves as a liaison between agents that request services and agents that can fulfill requests for services.
Discoveryis a means by which knowledge of agents and infrastructure entities is
propagated in Local and Wide Area Networks. Using Discovery, agents are
dynamically registered and unregistered on multiple ANS servers, and clients (a
module in the agent) and servers update their lists of available agents and
servers on a dynamic basis. As agents and ANS servers come and go from the
network, the client and server lists are expanded and contracted respectively.
Agents can be initiated before an ANS server is online, and instead of
failing, they will register with an ANS server when one becomes available. ANS
servers can be updated with knowledge about agents from other servers who relay
agent registrations and unregistrations to them. We describe ANS and Discovery
below, and in more detail in the document entitled ANS v.2.8 (file name:
javaANS.PDF – included in the CD distribution and online at http://www.cs.cmu.edu/~softagents/ans/ANSv2.9.PDF).
Agent Design in RETSINA AFC
 Agents can be designed and
built in many ways. Several toolkits (AgentBuilder, JADE, Tryllian) already
exist. Each of these toolkits implements agents differently, based on different
design philosophies and different agent architectures. The agents built with
the Agent Foundation Classes are based on the RETSINA software agent
architecture. In Figure 1, we show the RETSINA agent types, as derived from the
basic agent:
Agents can be designed and
built in many ways. Several toolkits (AgentBuilder, JADE, Tryllian) already
exist. Each of these toolkits implements agents differently, based on different
design philosophies and different agent architectures. The agents built with
the Agent Foundation Classes are based on the RETSINA software agent
architecture. In Figure 1, we show the RETSINA agent types, as derived from the
basic agent:

Every agent is based on the basic agent. In AFC terms, every
agent inherits from the BasicAgent class. Any class derived from the basic agent is part of the Agent Abstraction
Layer (AAL). All other lower level components are part of the Communications
Abstraction Layer (CAL). These CAL components are used by the basic agent, and
are of course available to all agents. Of these CAL components, the
Communicator module and one or more look-up modules are already incorporated
into the basic agent.
Even though it is possible to write an agent based on the
BasicAgent class, it is recommended that agent creators and programmers base
new agents on one of the existing sub-classes deriving from the basic agent.
These four agents are the second level down in the inheritance tree.
Within this tree there are several more levels, depending on the
complexity of the agent class and how much development exists along a branch.
For example, as Figure 2 shows, middle agents can be further refined into:
Matchmakers, Brokers and BlackBoards. We have identified sixteen types of
middle agents in our research, but in AFC only provide the three types shown
below. Developers are invited to derive their own set of middle agents.

Before exploring agent functions, we first need to define an agent, and
how we can view them from a software standpoint. We could describe a generic
agent as a standalone survivable piece of code with communicative and
intelligent behavior. What should be noticed immediately is that this describes
an entity that is completely separate from any system design or configuration.
We therefore need a construction abstract enough to facilitate intelligent
behavior, while also allowing for integration into existing operating systems.
Figure 3

The mechanism by which we do this is called “containment.” We contain
the agent in a sub-shell with a well-designed Agent Protocol Interface (API),
so that developers can write custom binding for specific operating systems and
architectures. The actual abstract agent is what we will work with to create
complex agent types. Figure 3
illustrates the principle whereby the barrier between operating system and
agent is termed the AgentShell, and the Agent base code (base class) itself is
termed the BasicAgent.
The agent shell has two main functions. First, it makes the existence of an
agent possible in the world of heterogeneous operating systems. Secondly, it
provides the agent with a number of basic facilities. For example, when writing
a shell, a developer will have to provide the agent with a one second
resolution timer. It will also have to handle messages originating from within
the agent regarding its operation. An agent can indicate that it wishes to
shutdown or, if it has a visible client area, it can indicate that this should
be minimized or even hidden from view. A number of pre-defined agent shells are
shipped with the AFC distribution. These standard shells are:
- CDlgContainer, a Microsoft MFC based shell that encapsulates an
MFC dialog window;
- CSDIContainer, which can be used to create MFC SDI based
applications;
- CMDIContainer, this is the same as the previous shell but creates
an MDI window;
- CQtContainer, A Unix and Windows targeted shell for visual
agents;
- CDeamonContainer, a shell for Unix daemon development;
Figure 4

The instructions below (see Building the First Example Agents) contain
detailed instructions on how to develop a new agent shell using the BasicAgent
class.
For generic agent development, you do not need elaborate knowledge of
the operating system or agent shell programming. You will most likely remain
within the basic agent context and will use the tools provided by the AFC.
The basic agent itself runs and manages a set of client modules designed
to manage data and dialogs with external entities, as shown in Figure 4. Their
tasks can range from providing file logging to interaction visualization, to
middle agent interaction. The AFC provides a number of tools and base classes
to develop custom clients, and we highly recommend their use whenever an agent
is designed to interact with other agents.
All of the modules managed by the basic agent are run separately and
have no direct influence on one another. This modular independence makes the
agent more robust and prevents total agent failure due to a cascading effect.
Every agent designed and developed with the AFC will incorporate a set of basic
behaviors. These behaviors were developed for the agent’s survival, maintenance
and management.
All agents constructed using the AFC SDK will have a fixed and well-defined
life cycle. Each stage of this cycle
represents a checkpoint at which either the agent or agent developer can
influence the behavior of the agent. Since all AFC agents are event driven, so
too is the life cycle. Each cycle or stage can be triggered by an
- Internal event
- External event
- Agent developer imposed
event
In the process of the development of your agent, you will be confronted with decisions regarding each
of the agent’s life stages. There are a number of main events/triggers that
drive the cycle transitions. All of the events and stages are managed and
generated by the Basic agent. There are 5 main stages an agent can experience
during its lifetime. These are:
- Agent Birth
- Agent Initialization
- Agent Creation
- Agent Main
- Agent Shutdown
- Agent Destruction
The stages listed above correspond to virtual methods within the
CBasicAgent class. Within the Main stage, an agent can be given more detailed
events. (The Main stage is the main running loop of the agent’s life cycle).
Overriding one or more of these methods will provide you (the developer) with
control over the agent’s general behavior.
Other methods are provided to govern and refine your agent. For
instance, every agent is equipped with lookup modules, which give your agent
the capability to investigate its network surroundings. There are also modules
designed to work specifically with specific infrastructure components such as
matchmakers and logging agents. We will explain how to work with these events
in the section below entitled, “Building the First Example Agents.”
Every agent is configured with one or more file-logging modules. These modules
provide detailed information to external entities as to the functioning of the
agent. The file-logging module allows an agent to stream internal events to a
file on disk. The file contains detailed information on the agent’s actions. We
will demonstrate in a later section how to add entries to the log-file. All
log-files are maintained in the root (RETSINA) directory under a subdirectory
called “Logfiles”. These files are organized in date-stamped directories. (See
Installation Instructions, below, for how to manage the behavior of logging
modules). All log-files are created by the agent in a directory with the name
of the day and month on which the agent was started.
All agents built with the
AFC maintain PID files in the RETSINA system directory. The PID provides for
the following functions:
1) It assists agents in
identifying other agents running on the same platform. If it is programmed to
communicate with a user via a voice, for example, an Interface agent should be
able to find a SpeechAgent running on the same system.
2) It allows agent
management tools to rapidly see what agents are running and what agents have
crashed, by providing a comparison of the file entries with the list of agents
actually running on an ANS server.
To use the RETSINA Agent
Foundation Classes you will need
The
version of the RETSINA Agent Foundation Classes as described in
this manual requires that the following applications are present prior to
installation:
1. Visual Studio 6.0 (this has to have been run at least once prior to AFC
installation)
2.
Java 1.2 or higher (runtime environment)
To run agents on your own
computer only, you do not need to be connected to a networked domain. To
discover and communicate with agents running on your local area network (LAN)
or across networks (WAN) (see Discovery
section below), you will need a live Ethernet connection.
When we refer to Agent Name
Servers below, we mean an agent infrastructure component that can reside
locally on your machine. You can register with an ANS server on your own
machine; you do not need to be connected to a specific network to connect to an
ANS Server, but in order to find and communicate with other agents, you will
need to find and register with non-local ANS servers using Discovery.
1.p; You must be
logged in to Windows as the “Administrator” in order to properly install the
AFC.
If logged in otherwise, restart and login as “Administrator.”
2.p; Insert the AFC
Development Kit CD-ROM into CD ROM Drive. The CD should start up automatically.
If it does not, go to “Start” menu, scroll to “Run” and browse to the CD-ROM
drive. Select the setup.exe file and click ok.
3.p; A welcome GUI
(shown below) for the Installshield™ Wizard, which installs the RETSINA Agent
Foundation Classes, should appear. To begin installation, click “Next.”
4.p; Please read and
accept the CMU licensing agreement.
5.p; The Read-me file
will appear. It contains information on the latest updates, which may not be
reflected in this manual. It will be stored in the directory for the software.
Click “Next.”
6.p; The next GUI is
for setting the installation path. This path designates the root location where
all the libraries, files and examples will be stored. The default path is
C:\program files\RETSINA. You can change this path, but we recommended that you
do not.
7.p; The next GUI is
the “Setup Type” window. 
Choose installation type and click “Next.” The options signify:
a.p; Administrator
(for WinNT 2000 and XP, for installation of multiple users).
b.p; Compact:
installs the smallest configuration necessary to build agents: for users with
limited drive space or who do not need agent examples. Not recommended for
first-time users.
c.p; Custom: To
choose components. For experienced users.
d.p; Typical: To
install complete set of files. This is the default and recommended installation
setting.
8.p; The next window,
“Start Copying Files,” is an overview of the installation. In this part of the
installation, the program detects whether or not C Visual Studio 6.0 is
installed on your computer.
In the figure below, you can see that version 1.10 of AFC will be installed and
that the program has detected the presence of Visual Studio 6.0. Click “Next”
to begin the installation.
![]() If Visual Studio 6.0 has not been installed,
cancel the installation. Install Visual Studio 6.0, and run it at least one
time before reinitiating the installation.
If Visual Studio 6.0 has not been installed,
cancel the installation. Install Visual Studio 6.0, and run it at least one
time before reinitiating the installation.![]() If you have Visual Studio 6.0 installed, and
it is not detected by AFC, then you may have never run the program. In order to
set its environment, the program needs to run at least one time. Cancel the
installation and run Visual Studio 6.0, then recommence installation.
If you have Visual Studio 6.0 installed, and
it is not detected by AFC, then you may have never run the program. In order to
set its environment, the program needs to run at least one time. Cancel the
installation and run Visual Studio 6.0, then recommence installation.
9. Click “Finish”. The installation is
complete.
Note: This section provides general reference information
on running agents. Follow the instructions in the example sections to begin
running your first agents.
When you navigate to the directory examples (see instructions for using
examples, below) you will find example projects with fully working agents.
An agent can be started in two ways, either by
double clicking its icon or by starting it from the command line. There is a
clear distinction from the agent's standpoint what the different methods
signify. When an agent is started by double-clicking its icon, it assumes that
it will have to find its basic information somewhere on disk, or from the user.
When an agent is started from the command line it will expect to supplement the
information it finds in well-known locations and resources with the information
supplied in command-line parameters. If it doesn't find that information, it
will revert to the first method, as if it had been started as an icon.
Every agent understands a number of command line
parameters. Below is a list of all the parameters that every agent build with
the Agent Foundation Classes understands:
| Parameter: | Value: | Example: |
| -name | The name of the agent as
should be registered with an ANS | -name SpeechBroker |
| -help | Show a help screen which
explains the command line options | -help |
| -port | This specifies what port
the agent should use for listening | -port 6678 |
| -ansname | The hostname or ip address
of the ANS | -ans
midea.cimds.ri.cmu.edu |
| -ans | The port at which the ANS
server is listening | -ans 6677 |
Every agent is compiled
with a number of internal client modules. These modules complement the agent’s
basic behavior and allow inspection of its internal workings. Other modules
dictate basic behavior such as:
· Register with a
MiddleAgent
· Process and/or
propagate window parameters to the agent shell
· Enable/Disable internal
components to create non-communicative agents
Below is a list of
additional parameters that can be used to control a number of non-essential
modules.
| Parameter: | Value: | Example: |
| -win min | If the agent has a
graphical window, minimize upon creation | -mm min |
| -win max | If the agent has a
graphical window, maximize upon creation | -win max |
| -win hidden | Hide any graphical user
interface from the desktop | -win hidden |
| -noans | Disable the ANS module and
run standalone | -noans |
| -mm | The name of a primary
MatchMaker | -mm MatchMaker |
| -ddp | Name of a visualizer or
logging agent | -ddp DemoDisplay |
| -ddn | <enable/disable>
Enable or disable the visualizing module | -ddn enable |
| -dpp | Portumber of a desktop
agent (if used) | -dpp 6658 |
If you haven't specified a visualization system with command line parameters,
the
agent will prompt you for the name of a visualization or logging agent. You
will
not get this dialog box if the agent hasn't compiled support for this type of
logging. Below is a screenshot of the window, which will pop up when an AMS has
not specified a visualization agent
 When you don't specify
anything at this point, but instead just click 'OK', the
When you don't specify
anything at this point, but instead just click 'OK', the
visual logging module will be initialized with a default name. This is normally
'DemoDisplay'. After you've selected a different name for the target agent,
click
on 'Commit'. This will ensure that information is propagated to the agent code.
If no ANS server was specified using either one of
the configuration files or command line parameters, the agent will pop-up a
dialog box. You can use this window to register with an Agent Name Server.
Choose a server from the list, or enter a new one. Then
press 'register' and the agent should inform you whether or not the
registration process was successful. Use the 'unregister' button if you
accidentally register with the wrong server. This process will not affect the
already-running agent. When all goes well, the dialog should look like the
dialog box in the second figure, below. The list of agents you will see in the
drop-down box is obtained from the RETSINA system directory. We provide more
information on this in the following sections.


After Successful Registration
PART
II: EXAMPLES
Now that the AFC software is
installed, you should now be able to test your agent system by running the most
basic agent examples. The test will verify that the system is properly
installed, while also demonstrating a basic communication between agents.
![]() If you do not have Java installed, you will
not be able to run the Java ANS server. In this case, or in case of failure of
the Java ANS server, you may run the Windows-only version of the ANS server, by
going to Programs\RETSINA\tools. Select Windows ANS server. If you use the
Windows-only ANS server, an icon will appear in the system tray, which
signifies that the ANS server is active.
If you do not have Java installed, you will
not be able to run the Java ANS server. In this case, or in case of failure of
the Java ANS server, you may run the Windows-only version of the ANS server, by
going to Programs\RETSINA\tools. Select Windows ANS server. If you use the
Windows-only ANS server, an icon will appear in the system tray, which
signifies that the ANS server is active.


AgentB will appear with AgentA on the DemoDisplay:

The agents will automatically register with the ANS server, and will begin to
pass a series of messages to each other based on a simple pattern: AgentB will
send a message= “0” (seconds). AgentA will reply with B1 + 1 (AgentB’s first message + 1) (or
0+1). AgentB will wait a second and reply with A1 +1 (or 2 seconds).
AgentA will wait two seconds and reply with B2 +1. AgentB will wait
three seconds and reply with A2+1, etc, until you quit one of the
agents.
7. Double click on the ANS server icon in the system tray (in the Windows-only
version of the ANS server only) to check the registration of the agents. A
window like the one below should appear, which shows the Hostname and port, the
agents’ names port numbers, and the time of registration.

Now that you have run the
first example of a RETSINA agent system, we will
show you how to build that
example using the Agent Foundation Classes and
Visual Studio. In this example,
we demonstrated two agents, AgentA and AgentB.
This means that we will have
to create two workspaces in Visual Studio, one for each agent. We will show you how to build the skeleton
for AgentA. From this, you should be able to build AgentB. If you have
difficulty, you can always refer to the agent code in the actual examples
provided.
Both AgentA and AgentB are
identical in that they take in a number wait for the number of seconds
indicated, add one to the number and send it back to the receiver. The only
difference between A and B is that A starts the sequence. This means that
AgentA needs some additional code to begin the dialog with AgentB.
We will go through the
example by showing what parts were added to the files generated by the
workspace.
Once you have the full set of agents as used in step 1, we will explain how the
added code works together with the AFC to create the small agent system. Let's
begin by building the workspace for AgentA.
We will now construct a basic RETSINA agent using the Agent Foundation
Classes. This example is for Microsoft Windows™. The CDROM contains numerous
examples for other operating systems. Except for the interface differences, the
agent programming interfaces are all the same. Once you know how to construct your agent, building the agents begins in
the same way on all platforms.
 Start Visual
C++ and select the ‘new’ option from the file menu.
Start Visual
C++ and select the ‘new’ option from the file menu.
You should now see the dialog window as shown in the Figure below. If
the AFC SDK has been properly installed you should see a MFC project called: MFC
Retsina Agent AppWizard. Select this project and type the name of your
agent (AgentA) in the ‘Project name’ field.

When clicking ok you should see a dialog where you can choose what sort
of graphical user interface style you would like to use.

We strongly suggest that you construct these agents with the use of a
Visual C++ guide. We chose to create a Dialog based agent for this example. The
agent is labeled AgentA.
AgentA Workspace

Once you’ve navigated through the configuration dialogs you will end up
with a screen similar to the figure above (AgentA Workspace). It shows the
newly created agent project and an empty dialog window that can be used by the
agent. A status bar has already been included, which will show all the messages
generated by the AFC components and modules. These files mirror the messages
logged to disk.
With the AgentA project a number of files were created. Most of these
files are particular to Microsoft Visual C++ and can be used to connect any
visual code to the agent code. The files you should be seeing in the file pane
are: c_AgentA.cpp, AgentA.cpp, AgentA.rc, AgentADlg.cpp and StdAfx.cpp. These
are the basic source files. The actual agent code is contained in c_AgentA.cpp.
It contains the implementation of an agent derived from CBasicAgent. Comments
are included to explain the behavior of the example code.
In a previous section we
described the general anatomy of an agent. We will now provide the translation between that model and its
implementation. At the base of our agent is one class that represents all core
behavior and functionality: CBasic Agent. No matter what kind of agent you
create, it will be derived from the basic agent. Throughout the examples provided here, we will use an agent class
called AgentA, which is directly derived from our basic agent. As we progress,
you will become more familiar with the different kinds of agent derivations and
their functionality. We will introduce information agents and middle agents.
All of these classes are based on the basic agent and you will therefore need
to understand how to develop with this class.
If you do not already have
the workspace for AgentA open, open it now. Make sure that the left pane is set
to the 'files' view.
Note: All agent-related files start with 'c_'. This is
done intentionally, in order to keep native code separate from agent-based
code. By “native code” we mean all source code that ties-in with OS-specific or
graphical-interface-specific functionality.
The Agent Application Wizard
created two files for you that encapsulate the actual agent. For AgentA these
should be: c_AgentA.cpp and c_AgentA.h. Open up the file c_AgentA.cpp in the
editor. You will see a large number of comments. These comments indicate what
particular part of the agent is active at any one time.
Open the file c_AgentA.h. In
this file you will be able to see what is needed to build an agent. For our
example, we only need to add the declaration of two variables. Add the
following code to your class:
private:
int
counter;
int step;
The first variable keeps
track of how many seconds the agent is currently waiting. The second variable
indicates how many seconds the agent should wait. This last variable is the one
to which the agent will add an increment and then send to AgentB. For our purposes here, you do not need to
make any further alterations to this file.
Open the file c_AgentA.cpp
and find the constructor definition for this class. Change the content of the
constructor until it looks like this:
CAgentA::CAgentA(char *a_name) : CBasicAgent
(a_name)
{
counter=0;
step =5000;
}
What we have done is to
initialize the variables. (Note, we set the step variable to a high number.
This is done to trigger the start of the dialog, which is explained later in
the manual).
AgentA’s functionality calls
for a timer. The basic agent in the AFC provides a one second timer event. In
this example we will use that time event to update our internal state. Find the
method implementation that looks like:
void
CAgentA::process_timer (void)
This method will be called
every second. When the Agent Application Wizard creates your agent, this method
will be empty. Change this method so that it resembles the source listed below:
void CAgentA::process_timer (void)
{
char
message [512];
counter++;
if
(counter>step)
{
counter=0;
step++;
sprintf
(message,":number %d",step);
char
*reply=Communicator->comm_sendmessage ("tell",
"AgentB",
"default-language",
"default-ontology",
NULL,
NULL,
NULL,
message,
NULL);
if
(reply!=NULL)
debug
(reply);
else
debug
("Message sent to Agent");
}
}
Let's examine what happens
in this method. We see that if our counter is greater than the amount of
seconds we should wait, the agent resets the counter and adds 1 to the amount
of seconds the receiving agent has to wait.
Next, we created a message
that can be understood by AgentB, which will be sent to it using the
comm_sendmessage method from the Communicator. Some additional code was added
so as to determine whether or not the message was actually sent. We constructed
the message using the KQML Agent Communication Language. Here we show you a bit
of what the language actually looks like. We created a string that has a token
called 'number' and a ‘contents’ of that number from the step variable. This
string is then provided to the Communicator along with a number of other
parameters.
The message string as it is used here is something we call the content field.
This is the field where you will find most of your information. The other
fields are used to route and process message properly.
Now that we know how to send
a message to an agent, we need to be able to receive messages. The last update
we need to make is to add the appropriate receiving code. Find the line in the
file that says:
BOOL CAgentB::process_message (char *data)
The basic agent calls this
method when a message arrives. As you can see, it is left empty by the Agent
Application Wizard. Add code as the content of this method, so that the final
method looks like this:
BOOL CAgentB::process_message (char *data)
{
CParser
*c_parser=new CParser;
if
(c_parser->parse_message (data)==FALSE)
{
delete
c_parser;
debug
("<CAgentB> Unable to parse incoming message");
return
(FALSE);
}
char
*sender =c_parser->find_sender ();
char
*content=c_parser->find_content ();
if
((sender==NULL) || (content==NULL))
{
delete
c_parser;
debug
("<CAgentB> Either sender or content field is NULL, unable to
proceed");
return
(FALSE);
}
CParser *r_parser=new
CParser;
if
(r_parser->parse_message (content)==FALSE)
{
delete
r_parser;
delete
c_parser;
debug
("<CAgentB> Unable to parse content field");
return
(FALSE);
}
char
*number=r_parser->find_token ("number");
if
(number==NULL)
{
delete
r_parser;
delete
c_parser;
debug
("<CAgentB> Number not found in content field");
return
(FALSE);
}
step=atoi
(number); // change the step
delete
r_parser;
delete
c_parser;
return
(TRUE); // we processed the message so we have to indicate this back
}
Let's examine the additions
we have just made. The first thing you should notice is that the method returns
a Boolean value. This is important when you start to build more complex agents
or when you build agents that other people will build upon. If your agent code
returns a TRUE value to the basic agent, this indicates that the method
processed the message. In other words it tells the developer who uses your
agent class that the message was meant for this class, and not for the derived
agent class.
Next, we enable our agent to
parse the message by creating a new parser object and calling the method:
c_parser->parse_message
(data)
If this method fails the
message received was most likely corrupt. This can happen for a variety or
reasons, but most likely it is caused by a malformed, “hand-written” message.
As you can see, when the agent cannot parse the message, it cleans up the
parser and tells the basic agent that it did not consume the message. If it was
able to parse the message, it needs to find two important fields: sender and
content. The sender field will tell our agent where to send the reply and the
content will give our agent the value of the number.
(Remember that AgentA and
AgentB are identical, so the code you see here is also found in AgentB). Our
agent checks to see if the sender string is not NULL and then proceeds by
parsing the content field.
One thing to remember about
the Agent Communication Language is that any field can contain a number of
other fields. In this case the content field contains the number field we
created in the timer method. We create a new parser called r_parser and we call
the same parse method, with the content field now as a parameter:
r_parser->parse_message
(content)
If this method succeeds, we
should be able to retrieve the number field from the r_parser. Look for a line
that says:
char
*number=r_parser->find_token ("number");
This will retrieve a pointer
to a string called number from the parser. If we constructed our message
properly the number string should point to a text representation of our number.
The last task we do is to convert the text representation into our own variable
'step', using one of the basic string C library functions:
step=atoi (number); //
change the step value
We have changed the step
variable and now the agent can wait the amount of seconds this variable
indicates.
You should now be able to
build AgentB. The only difference between the two agents is that the
constructor for AgentB looks slightly different than for AgentA. Here is the
implementation, as you will find it in the actual example:
CAgentB::CAgentB(char *a_name) : CBasicAgent
(a_name)
{
counter=0;
step =0;
}
In Example 1 we demonstrated
a basic multi-agent system consisting of two agents, both of the same type. In
the RETSINA architecture we define 4 basic agent types:
The agents we used in the first example can be considered task agents. However,
since we did not need our agents to perform complicated tasks, we used the most
basic agent form from the AFC.
We will now add a new agent to the scenario that is based on the AFC
Information Agent. The agent we will add can tell us the time of the local
system. In other words, when we ask it, it will tell us the date and time of
the system on which it is running. Since we are running all the agents on the
same system, we will be receiving the time of the local system. The agent that
provides the time and date is named the DateTimeAgent.
Note: There are four main ways of soliciting information
from Information Agents in the RETSINA agent community, each with their
corresponding Information agent behaviors:
1. Single shot query: The requesting a gent asks for information once;
the service provider implicitly de-commits to providing the service/information
again after the first reply, or upon a timeout.
2. Active monitor query: The requesting agent asks the information agent
to actively monitor an information source and to provide information, typically
on a periodic basis (e.g. every 60 seconds). The Information Agent
acknowledges the request, informing the requester how to end the service.
The service-providing info agent continues to provide the service until it
receives an explicit message from the requester asking it not to provide the
service any more.
3. Passive monitor query: The requesting agent asks that the
service-providing agent notify it of the occurrence of an event or condition,
for example, a change in stock prices; the recognition of an explosion, enemy
platoon; or a stock price change. The subscription and quit process are the
same as with the active monitor query.
4. Update query: Upon exporting
or archiving data from the agent world, an information agent issues an update
"query" to another information agent, asking it to update a database
record or external archive.
In this example, we use the
active monitor query method.
AgentA sends a message to
DateTimeAgent to start-up the active monitor query. The monitor query is set at
20 second intervals, but the programmer can set the value at any interval, to
as low as 1 second. Every 20 seconds, the information agent informs AgentA of
the current time. A-B messages are interrupted by the time monitor replies. This
sets the second counter in AgentA to zero. AgentA and B communicate as in the
above example (message+1).
First we will demonstrate
how to create the new Information Agent. Then we will show you how to integrate
this new agent into the scenario.
Start by re-creating AgentA
and AgentB, or copy the two projects to a new directory.
Create a new workspace with
the RETSINA Application Wizard, naming the project DateTimeAgent. This should
produce a new workspace with the files:
c_DateTimeAgent.cpp and c_DateTimeAgent.h
As in the first example,
look at the header file that holds the new agent’s (Information Agent)
declaration. Open the file called c_DateTimeAgent.h. This file will appear to
be very similar to that of the other agents you have built so far. To make the
agent an Information Agent, you need to change the base class to look like
this:
class CDateTimeAgent : public CinfoAgentBase
The
new agent will have all of the normal event methods as defined by the basic
agent, and will have the additional capabilities of the Information Agent. When
we are dealing with specific agent types we do not need most of these methods.
In fact, in our example we can remove all of the methods and replace them with
one single event method. The Information Agent as defined by the RETSINA
architecture uses something termed an “external query function”. The RETSINA
planner traditionally calls this function. In certain versions of our agents
this might still be the case. In our example Information Agent, the base class
will call the external query function.
Add
an entry to your agent in the protected area and call it:
char
*external_queryfunction (CLList *);
We need one more addition to complete the agent; add a private variable
called
b_message
of type string. In your code this should look something like:
private:
char *b_message;
This string will hold the result of the
query as sent in the content field to the requesting agent.
Now
let's check to see whether the new agent looks like an Information Agent. If
you've made all the changes and added all the code stated above, your class
should resemble the following:
Open up the file
c_DateTimeAgent.cpp.
Since we are dealing with a
more specialized agent here, we do not need a lot of the overhead we used in
the other agents. In fact we only need to add code to three methods. First of
all we need to initialize the string we will use to communicate the result of a
query. Find the constructor of the agent and add the following:
This code cleans up the
memory that was used to create the replies.
All that is left to do now is to fill in the content of the external query
function. You will manually have to add the method to your file, since the
Agent Application Wizard did not add this method for us. When you are finished,
your file should have the following method:
So far, we have introduced basic task agents
(A and B), and an information agent (DateTimeAgent). We have tested and built
these agents, and observed their communications with each other. We will now
introduce one of the most important components of the RETSINA MAS, the
Matchmaker. The Matchmaker is an agent that helps make connections between
agents that request services and agents that provide services. The Matchmaker
serves as a "yellow pages" of agent capabilities, matching service
providers with service requestors based on agent capability descriptions. The
Matchmaker system allows agents to find each other by providing a mechanism for
registering each agent's capabilities. An agent's registration information is
stored as an "advertisement," which provides a short description of
the agent, a sample query, input and output parameter declarations, and other
constraints.
In this example, AgentA does not know the
name and location of the DateTimeAgent, and will have to find it, using the
Matchmaker. The Matchmaker will find the DateTimeAgent in response to a request
from AgentA for an agent with date/time capabilities. It deliver the requested
agent capability in a reply to AgentA.
This example will build on the agent
scenario from Step 2. In order to demonstrate the functionality of the
Matchmaker, we will have to start a different version of the task agent, one
that does not know the DateTimeAgent (i.e., does not have hard-coded
information on the DateTimeAgent in its cache). Be sure to use the AgentA and
AgentB versions as found in Step 3.
1. Start the ANS server.
2. Start the DemoDisplay.
3. Start the Matchmaker: Program files\RETSINA\tools\java
GinMatchmaker
4. Start the DateTimeAgent. The DateTimeAgent will
advertise its capabilities with the Matchmaker. (This passing of this
advertisement will not be discernable on the DemoDisplay).
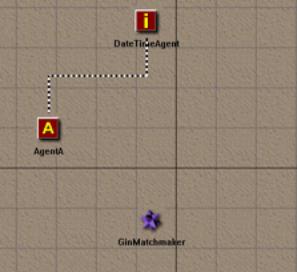
5. Start AgentA (from the step 3 directory). Upon
initialization, AgentA will query the Matchmaker for an agent that can provide
the date and/or time, as shown below on the DemoDisplay:

It will receive a reply from the Matchmaker, which will return information
about the DateTimeAgent. AgentA will then query the DateTimeAgent, as shown
below:
This query starts the monitor query as in
Step 2.
6. Start AgentB (from the step 3 directory). AgentA and
AgentB will communicate as in earlier steps, interrupted by the DateTimeAgent,
which resets sequence as in step 2.
Copy the projects and files from step 2 into
a new location. We will use these projects and files to build upon and extend
your agent's capabilities, so that it can use a middle agent.
We need only make changes in order to extend
our basic agent’s capabilities to include the capability of using of a middle
agent.
Open the file c_AgentA.cpp and find the
process_init method. In step 2 the agent used this method to initialize a
monitor query with an information agent. In this step, the agent will request
that the Matchmaker deliver information about any agents that can provide the
time/date.
Clean out the content of the process_init
method and replace it with the following code:
CMatchmakerClient
*mmaker=get_mm_module ();
if (mmaker!=NULL)
{
CFileBuffer *file=new CFileBuffer;
char *buffer=file->load_a_file ("target-schema.txt");
if (buffer!=NULL)
{
char *agent_monitor=new char [strlen (buffer)+1];
strcpy (agent_monitor,buffer);
if (mmaker!=NULL)
mmaker->mm_monitorAdvertisements (agent_monitor);
delete [] agent_monitor;
}
else
debug ("<CAgentA> Unable to load the target information
agent
advertisement template needed for advertisement monitoring!");
delete file;
}
With this code fragment, we load an
advertisement into a file object. Then, we assign the file object to the
Matchmaker client. The contents of the
file that was loaded is a description of the kind of agent capabilities our
agent seeks. You can open the example file in a text editor to examine the
contents and format of the advertisement. It is a small advertisement that
tells the Matchmaker to look for similar capability advertisements from other
agents. The actual request in the above code consists of two lines:
if
(mmaker!=NULL)
mmaker->mm_monitorAdvertisements (agent_monitor);
These lines direct a task agent client module
dedicated to the Matchmaker to tell the Matchmaker to look for the
advertisement given as a file object. The Matchmaker will tell AgentA whether
or not any agents with such capabilities are available.
In the test example, the DateTimeAgent
advertised with the Matchmaker. Putting a file named adv-schema.txt in the
directory from which the information agent starts creates this communication.
The contents of this file is a capability advertisement like the one used in
the code fragment above, which told the Matchmaker what capabilities our task
agent is looking for. The content of this advertisement is written in an
advertisement language called GIN.
Now that Matchmaker is aware that an agent
is available conforming to the request sent by AgentA, it will reply to AgentA
with the name and advertisement of the DateTimeAgent. In order for AgentA to
process this reply we add the following code at the very top of the
process_message method:
CMatchmakerClient
*mmaker=get_mm_module ();
if (mmaker!=NULL)
{
if (mmaker->get_updated ()==TRUE) // we received an answer from the
Matchmaker
{
debug ("<CAgentA> Processing change in Matchmaker
module");
if (mmaker->get_last_operation ()==__MM_OP_NEWAD__)
{
CServiceInfo
*service=mmaker->get_last_service ();
if (service!=NULL)
{
// next see if the
advertisement is a device ontology
CGINAdvertisement
*ad=(CGINAdvertisement *)
service->get_first_element ();
if (ad!=NULL)
{
char
*reply=Communicator->comm_sendmessage ("tell",
p;
ad->get_agentname (),
p;
"default-language",
p;
"default-ontology",
p;
NULL,
p;
NULL,
p;
NULL,
p;
"objective :name \"getInformation\"
:parameters (listof (pval \"primary-keys\" \"time\") (pval
\"trigger\"
\"any-change\") (pval \"period\"
\"20000\"))",
p;
NULL);
if (reply!=NULL)
debug (reply);
else
debug ("Message sent to Agent");
}
}
else
debug ("<CAgentA> Unable to
obtain new agent info");
// done handling message from
Matchmaker -------------------------------------------------
}
mmaker->set_updated (FALSE); // tell the Matchmaker we noticed
the change
return (TRUE);
}
}
As you can see from the code above, we first
obtain a pointer to the Matchmaker client module.
CMatchmakerClient
*mmaker=get_mm_module ();
This module will be able to tell us whether
the Matchmaker has sent a reply to the task agent. The following line --
if
(mmaker->get_updated ()==TRUE)
-- indicates that a message came in and that
indeed something changed within the Matchmaker. Now AgentA need only learn
whether or not the Matchmaker has the name of an Information Agent that matches
the capability requested.
First, we check to see if the client has
received a new advertisement, or in other words, news of a new agent:
if
(mmaker->get_last_operation ()==__MM_OP_NEWAD__)
(Since we only have one Information Agent running,
we know that this must
be a match for AgentA’s request. We obtain a pointer to the service description
the Matchmaker client can provide us):
CServiceInfo
*service=mmaker->get_last_service ();
In other words, AgentA tells the client, “give
a pointer to the last service you saw.” Upon examination, AgentA detects that
the service description object contains the advertisement and the name of the
agent it seeks. Below is the code that will extract the advertisement from the
service description:
CGINAdvertisement
*ad=(CGINAdvertisement *) service->get_first_element ();
A service might have more than one
advertisement, but since we are only
looking for one capability we use the first advertisement in the list.
Below, we show the difference between the code used by AgentA in step 2, and
that used by AgentA in step 3. The difference is that we can now obtain the
name of the DateTimeAgent without supplying it in our code. The string
"DateTimeAgent"
from step 2 has been replaced with
ad->get_agentname
()
in step 3.
This example should serve to get you started
with basic Matchmaker interaction.
All of our demonstrations thus far have assumed
a stable environment in which our agents live. In this example, we demonstrate
a means by which agents can continue to function, even when their environment
is changing, and when key components of the system come and go. Before testing
this example, however, we discuss the features employed to make this possible,
and the reasons for their development. You can skip to the instructions for
testing, if you want to see these features in action before, or in lieu of,
reading about them.
As
agent-based applications move beyond simple test-case scenarios, the truly
dynamic and unreliable nature of the agent world becomes apparent. Peer agents
can act erratically, middle agents and infrastructure services may become
temporarily unavailable, and various aspects of the environment that the
programmer assumed would be constant, turn out to be unpredictable. While the
robustness of the agent code handles some of these difficulties, the
infrastructure of the agent community should help with agent adaptation to
ad-hoc and dynamic environments.
As
we have shown, the RETSINA MAS utilizes middle agents (especially ANS server
and Matchmaker) to facilitate agent interactions. In addition to providing this
middle agent infrastructure, we have provided agents with an enhanced means of
locating and gaining access to them. A key technology that allows agents to
accommodate these ad-hoc environments is called “Discovery.”
Discovery is a means by which
knowledge of agents and infrastructure entities can be propagated in networks.
Using Discovery, agents and servers can automatically maintain dynamically
updated lists of available agents and servers. As agents, ANS servers and
Matchmakers come and go from the network, these internal lists are expanded and
contracted automatically. Agents can be initiated before an ANS server is
online, and instead of failing, they will register with an ANS server when one
becomes available and is discovered. ANS servers can be updated with knowledge
about agents from other servers, because these servers were able to discover
their peer ANS servers to provide redundancy.
RETSINA
agent services utilize the Simple Service Discovery Protocol (SSDP) that was
developed as part of the Universal Plug-n-Play (UPnP) consortium’s efforts to
support small/home and ad-hoc networking. This protocol is utilized at the core
services levels within the agent software libraries, to ensure that required
infrastructure services and middle-agent systems are known, and their location
information is available. While systems and agents come and go from the
network, the information available to the agent is kept up-to-date and
current. If additional servers become
available, their presence is made known throughout the community.
Infrastructure services also use the Discovery protocols to coordinate
interactions between each other, to ensure that agent information is
appropriately replicated, load balanced, and/or accessible.
We
will briefly describe the SSDP protocol, and then proceed to discuss the
specific ways in which it is utilized by various components of the RETSINA MAS
in order to manage connectivity to infrastructure services, specifically with
the Agent Name Services (ANS) process. Then, the specific integration details of the SSDP Discovery protocol
within the Agent Foundation Classes (AFC) are described. Finally, we demonstrate
some of these features in action.
The
Simple Service Discovery Protocol (SSDP) utilizes multicast transmissions to
allow systems to communicate with other nearby systems, without prior knowledge
of their existence or their specific locations (other than the standard
multicast group address and port as specified by the SSDP protocol.) SSDP services (systems that provide some
added utility when they are accessed) will utilize these multicast, managed
broadcast messages to tell other systems that they are 1) alive and available,
or, 2) leaving and no longer available. SSDP clients (systems that are seeking
to find services that advertise themselves via SSDP) will utilize multicast
messages to search for providers that offer a specific (or all) service(s).
SSDP service providers that receive the multicast search-request will send a
unicast message (one-way, non-multicast) to the requesting client, using the
return address that the client provided in its search.
Unlike
other Discovery protocols (such as SLP, Jini, etc.) the SSDP architecture is
extremely lightweight. Responses to search requests are URL-style strings. When integrated with UPnP, this SSDP
response is often the location of an XML document that further describes the
service being sought. In the RETSINA MAS, the response contains the host
address, and a port number where a TCP/IP socket connection to the service
provider can be initiated. Based on the service type requested in the client’s
search request message, it is assumed that all systems that answer the request
know how to interact with the prospective client.
A
problem with multicast transmissions is that many routers and firewalls limit
or prohibit their transmission. Given this limitation, the Discovery process
should be considered as providing the ability to locate other “near-by” systems
(those that are typically on the same, or adjacent network segments).
Additionally, the RETSINA implementation of SSDP restricts SSDP packets from
traveling any more than three hops along the network. This restriction
precludes problems that may arise from systems divulging internal numbering or
architecture information to malicious packet-voyeurs on the public
Internet.
The
Agent Name Service was the first RETSINA infrastructure component to support
Discovery.
As
we have mentioned above, the ANS servers provide a simple white pages service
for the agent community. Agent names are resolved into physical IP host
addresses, and port numbers. The ANS server maintains a registry of these
name-to-address records. ANS clients will contact an ANS server to “register”
their own information, lookup other agent locations, and eventually remove
their entry in the ANS registry (with an “unregister” command). They can also
request the server to provide a “list” of registered agent names that match
some simple string-based pattern. Agents can choose to communicate with other
specific agents on the network in many ways, but they will ultimately request
that their agent communications modules create a network link to the remote
agent. In making this request, the initiating agent provides the name of the
remote agent. The communications services of the agent architecture perform the
necessary “lookup” function with the available ANS system(s). (Agent programmers typically aren’t
concerned with the specifics of the ANS client, just that it works).
The
Discovery process, as described in the previous section, is composed of clients
and service providers, and their interactions. The Agent Name Service
implements various combinations of processes between the Discovery
service-providers and Discovery clients. Agents and infrastructure servers each implement both the client and the
server aspects of Discovery. Needless to say, the ANS server will act as a discover-ableservice. But it also acts as a Discovery-client of this same service. This
latter feature allows ANS servers to discover each other in order to provide
various levels of peer information sharing. And finally, the ANS client (that
is part of every Agent) acts as a Discovery client, so that it also can
discover the available ANS servers.
The
ANS client also implements both service and client Discovery interfaces to
locate other agents. This was done to facilitate continued operation of agent
applications when no ANS server is available. To integrate this capability, we added two features to the ANS client.
First, the client maintains its own cache of previous agent registrations
(learned through lookup commands). Cache entries have a limited lifetime and
will eventually expire. Secondly, the
cache is also populated by agent Discovery messages. That is, the current ANS
client software will act like an SSDP-enabled service provider and announce its
presence on the network as a “retsina:Agent” type of service. Other ANS clients
who see the “Alive” SSDP messages will either add this client to their cache,
or, if it already exists in their cache, extend the registration lease for that
agent. To reduce traffic and loading, agents consult their cache before
performing “lookup” operations across the network. This cache can also be used
for “list” operations (to retrieve a list of known agent names), if (and only
if) 1) no viable ANS server is present on the network, and 2) the
client has not disabled the Discovery process; and 3) the user has left
the default setting to “require an ANS” set to “false,” indicating that an ANS
server need not be present.
The
cache and its integration with the Discovery process helps to make agents less
susceptible to errors due to periodic outages of ANS servers, network links, or
from other routing problems. It also allows agent applications to begin
functioning without the existence of an ANS server, in case the startup
procedure sequence (start ANS server, start Matchmaker, start other middle
agents, then start agent applications) doesn’t progress as anticipated. Once an
ANS server comes online, the auto-register feature of agent’s ANS client will
automatically send the agent’s registration information to the server, and the
local server will then become the registration “authority.”
In the Agent Foundation
Classes, a number of Discovery-based facilities allow agents to find each other
without prior existence of desired lookup services on the network. Each agent
is fitted with an ANS client and a Discovery client that act as part of the
AFC’s lookup modules. These two lookup modules are used by the Communicator to
fill and maintain a common location lookup table. This table reflects the
agent’s view of the network. When an agent wishes to send a message to another
agent, it will give the message to the Communicator and indicate the target
agent. The Communicator in turn will either directly send the message, if the
target’s location information is available, or temporarily store the message,
and send out a request for the target’s location information. This location
request is handed to all available AFC location modules. When an answer is
obtained and the location lookup table has been updated, the original message
will be sent. Since all available lookup modules work in parallel, and since
they all use the same data-structure, the dependence on a specific lookup
client diminishes. As long as there is at least one lookup client active, the
location lookup table will be refreshed.
Discovery is an inherent component of the AFC. In some cases, however,
agent developers will want to disable Discovery modules. For example, a group
may be running sensitive experiments or demonstrations with a group of agents,
and will not want the ANS Server and/or the agents to be discoverable to
outsiders. You can configure the usage of both Discovery and ANS lookup in
agents.
You can also disable Discovery in ANS Servers.
By default, both Discovery lookup and ANS lookup are enabled in the AFC
agents. But, you can override one or both of them by calling the method
set_lookup_config
and the proper parameters. The set_lookup_config overrides the defaults and allows the developer to set the specific
parameters desired for the functions. If you want to enable Discovery lookup only,
you would call the method and set the parameter:
set_lookup_config
(LOOKUP_DISCOVERY);
If you want to enable ANS lookup only, you would call the method as
follows:
set_lookup_config (LOOKUP_ANS);
If you want to enable both lookups, you would call the method as
follows:
set_lookup_config (LOOKUP_DISCOVERY |
LOOKUP_ANS);
If you want your agent to be completely
standalone, you can call the method as follows:
set_lookup_config
(LOOKUP_NONE);
The settings for agent ANS or Discovery lookup parameters also control
the enabling/disabling of an agent’s discoverability by other agents. Thus, an
agent that has disabled Discovery lookup is also non-discoverable by other
agents.
You can change the usage of lookup modules while the agent is running.
Every lookup module is based on the CLookupModule class. This class has the
following access methods:
void enable (BOOL);
BOOL is_enabled (void);
Use this method to enable or disable one of the
lookup modules at runtime. In order for you to call the methods on the lookup
modules, you will need to obtain a pointer to one of these lookup facilities.
The following methods are available in the Communicator to do that:
p;
-----------
CANSClient
*retrieve_ans_object (void);
CDiscovery *retrieve_dsc_object (void);
Remember that both the CANSClient and
the CDiscovery classes are based
on the CLookupModule class.
To control the settings of the Discovery
parameters of ANS Servers, we have provided an alternative menu item in Start|Programs|RETSINA|Tools. The two options are:
- Java ANS 2.7
- Java ANS 2.7 (no discovery).
The prior is the default setting. The latter will disenable Discovery of your
ANS.
Beginning with version 2.8,
the ANS GUI tool is available as an alternative to the text-mode command
console for ANS servers. It can also be
executed as a standalone management tool; that is, it can be started and used
without starting a new ANS. The GUI tool allows you to examine and manage any
reachable ANS server. Even when
executing as part of a specific ANS server, you can still attach to and manage
other ANS servers.

 The Screen
The GUI Screen has six
interlinked panels as depicted in the table to the right. When the GUI is connected to a server, that
server information will be displayed in the “Current Server Information” area in
the upper left hand corner of the GUI. The current registrations (or a subset of them) can be displayed when an
agent name, when known, is typed in the field to the right of the
"List" button. Wildcard specifications can be used (e.g. brent* would
list all agent whose name contains "brent") when full agent names are
unknown, or when looking up an agent type (e.g. "matchmaker"), for
example. After typing the lookup specification desired, clicking on the
"List" button will list in the "Registered Agent Names"
field all agent names conforming to the specification. When an agent name in
this field is clicked on once, the Agent Name field below displays that agent's
name.
One way of connecting to a
new ANS is by filling in the hostname and port fields of the “New ANS Server”
panel in the upper right part of the GUI, and clicking the “Connect”
button. Requesting to connect to a
server will cleanly break any already existing, open session with another ANS
server, before initiating the new connection.
Since an ANS server may know about other ANS servers, you can, once connected to an ANS server, browse the lists of Discovered/Peer servers and Hierarchy servers that any ANS knows about, by clicking the respective “Update List” button.
The Discovery/Peer Server
List and the Hierarchy Partner List are both lists of ANS servers maintained by
an ANS server. Both lists are preloaded from static files on server startup.
The difference between them is that the Discovery/Peer Servers List is
dynamically updated by the discovery mechanism after startup. The Hierarchy
Partner List is the permanent list maintained in the cache of the ANS server
for partners with which it regularly shares information. Entries in the
Discovery/Peer List are typically dynamic, and servers are removed if they
cannot be reached. Both are described more fully in the ANS v.8 document
entitled, "javaANS.PDF." (included
on CD distribution and on-line at:
http://www.cs.cmu.edu/~softagents/ans/ANSv2.9.PDF)
Once an entry appears in one of these fields, clicking on it once will populate the New ANS Server fields at the top of the panel. Double clicking will proceed to connect to the new server; this is another way to connect to an ANS. Buttons to manage (add and delete) entries from these lists are provided, as well as to request that the server send out a new discovery message ("ReDiscover").
The Agent Information panel allows you to lookup, register, and unregister agent information with the attached ANS. The normal mode of operation of the ANS server is to share registration information updates with peer servers, and to propagate lookups to peers and hierarchy servers, if not resolvable locally. The “No Push/Pull” check box will restrict the request so that it is directed to the attached ANS server only.
As we said above, an agent
listed in the "Registered Agent Names" list box, when clicked on,
will have its name displayed in the "Agent Information" field. Double
clicking on agents in the "Registered Agent Names" list will perform
a lookup operation for the selected agent name, which will fill in the rest of
the boxes in the Agent Information panel (Hostname, Port/Socket #, Parameters).
Parameters include such agent information as the name; ttl= (Time to Live--the
number of seconds remaining in this registration's lease--a relative time);
expires= (the time stamp when the server will discard this registration or no
longer recognize it as valid -- in milliseconds of actual server time since a
certain starting point); type= (for agent type, such as: retsina:Matchmaker);
key= ( public key of agent); cert= (PKI X.509 certificate for agent). When a
lookup command cannot be resolved locally, the entries of ANS servers in the
Discovery/Peer
Servers List will be queried first, and then each entry in the Hierarchy Partner list will be queried.
As you manipulate the GUI, commands are sent to
the ANS server, as if you were typing them in the server’s text-mode
console. The “Server Console Command
Line” panel will show the actual commands that are being submitted to the ANS
server, and the text box below it will show the actual server response before
it is parsed into appropriate GUI fields. You can enter any console command
manually and hit enter, and see the results from the server. In this way, other features (such as
specifying a password) can be accommodated.
Version 2.8 of the ANS server will return
status and server startup help screens to any attached user that requests
them. Buttons to request this useful
information, as well as the current vocabulary of the console command lines,
are provided in the in the lower right hand panel. Updated versions of this
section of the manual are accessed by clicking on the “Graphical Manager HELP”
button. Buttons to break connections with the attached ANS server
("Disconnect Server"), and to request that the ANS server shutdown
and cease operations ("Shutdown Server"), are provided. The “Exit” button will terminate the GUI
(without terminating the ANS). When a new "gui" command is entered
into the ANS server console, the GUI will be reactivated if it has been closed.
The differences between the
two modes -- attached as part of a specific ANS server versus running as a
stand-alone management tool -- are apparent when moving towards a
“disconnected” state. In the
disconnected state, the tool is an interface allowing you to access a number of
ANS servers. In the connected state, the tool represents the ANS server
attached, and its registrations and messaging. Clicking the “Disconnect Server”
button in the lower right panel, a server-initiated GUI will be reconnected
(automatically)
to the “home” server for this ANS GUI manager (in other words, the server from
which the GUI was initiated.) When, on
the other hand, the ANS GUI manager is started as a stand-alone management
tool, a separate “discovery” process is initiated to populate the
“Discovery/Peer Servers” box, in order to provide the user with connection
alternatives from the nearby network segments. Thus, when you “Disconnect” from a specific server, you still can know
what other servers are available locally. When connected to a server, the “Update List” button will indicate what
other servers the attached server is aware of. Either way, the user always has
the option to manually fill in the “New Server” hostname and port fields to
manually initiate a server connection.
Thus far, all of our
examples have depended upon the agents’ foreknowledge of their environments—of
infrastructure components and other agents. Upon startup, the agents sought and
found information regarding other agents from the local ANS server. However,
there are cases in which agents will have to operate without an ANS
server. An agent might start up in an
environment where an ANS is not running. Or, the local ANS server might have
failed before the startup.
In this example, we
demonstrate Discovery; agents discover the DemoDisplay, and each other, without
the help of an ANS server. The use of an ANS location module is disabled within
the agents. Their ability to find each other and is made possible by the
Discovery process.
As we have mentioned, each
agent in AFC is fitted with a SSDP Discovery module. This module lives side by
side with the ANS module in the basic agent. The Discovery and ANS modules use
a common table to store location information. When there is no ANS module, only
the Discovery module will fill this table. The Discovery client will populate
the table with the replies to the look-ups that it sent out to the ANS Service
environment (received and replied to by agent service modules). The result is
that your agent will function quite happily without any lookup services on the
local network.
This example is identical to
the previous example except that we added a line of code to each agent's
'Create' method, which disables the use of an ANS client module. Use the
agents from Step 3.
1. Compile the agents and
start the sequence as before.
2. Start the ANS server.
(The ANS server is needed for the DemoDisplay to visualize the agents. However
our agents will no longer use the ANS. No messages will pass to and from the
ANS).
3. In both AgentA and AgentB
locate the 'Create' method. Change the content (which should be empty) to:
void CAgentA::process_create (void)
{
if (Communicator!=NULL)
Communicator->comm_disable_ans ();
}
5. Do this for DateTimeAgent. You will notice that the DateTimeAgent does not
have a ‘Create' method defined yet. Add
this to your agent using the information we've provided before. If you get
stuck, take a look at the pre-built examples on the CDROM.
The AFC provides a complete
set of libraries that allow an agent to connect to MAS infrastructure
components and communicate with other agents. Through the AFC the interaction
with the infrastructure and other agents in the agent world is highly efficient
and fully automated. However it is up to the agent to make decisions on whether
and when to initiate a conversation with other agents. Furthermore, the agent needs to make
decisions regarding what must be communicated to other agents. These tasks lie
in the realms of the problem solving modules of the agent. The AFC does not
commit to using a specific problem-solving engine. Our experience with AI
applications has taught us that there is no single best solution that fits all
situations. The selection of the problem-solving algorithm most applicable to
the situation depends on the problems the agent must solve and on the tasks
that it must perform. Ultimately, the task of the agent programmer is to select
(or implement) a problem-solving engine that suits the domain within which the
agent operates, and to use it along with knowledge that the agent possesses, in
order to be effective in its environment.
The AFC provides facilities
that allow the introduction of a problem-solving engine in the agent code, in
order to control the actions of the agent in an intelligent way. The task of
the programmer is twofold:
1. To link the agent code to a problem solving engine by
deriving the problem solver module from the class CProblemSolver. This class
provides some hooks that give easy access to the internals of the agent such as
the BeliefDB and the Communicator.
2. To implement the actions that will allow the agent to
operate in its environment. The class CPSActionCodes already provides some
basic agent oriented actions. More actions can be added by deriving a new class
from CPSActionCodes.
The distinction between the
problem-solver class and actions class adds flexibility to the agent
architecture, because it allows the implementation of agents with exactly the
same action code, but different problem-solving engines. Thus these agents can
act differently because they think differently, and not because they have
different capabilities. On the other hand, the AFC allows the implementation of
agents that employ the same problem-solving engine but have different actions.
These agents think in the same way, but act differently because of the way they
perform their tasks.
The class CProblemSolver
provides the basic methods that have to be overloaded to link problem solvers
to AFC-based agents. This is an abstract class that cannot be instantiated by
itself. To make use of the functionality of this class the problem-solving
engine used must be in a class derived from CProblemSolver. With the usual
constructor and destructor methods that should be implemented to provide access
to the problem-solving engine, CProblemSolver provides methods that allow
access to the main facilities of the AFC.
Specifically, the class provides the following methods:
1. BOOL GenerateSolution()
This is a pure virtual
method that must be defined in the child class and is used by the agent to
activate the problem-solver. In a typical agent this method would either contain
the core problem-solving algorithm or make calls to it seamlessly.
2. BOOL ExecuteActions()
This is also a pure virtual
method that must be defined in the child class and is used by the agent to
execute the actions selected by the problem solver. This method basically
implements an execution engine that transforms the problem-solver
representation of the actions to the actual actions that can change the agent’s
environment when executed. Additionally, it controls the execution of the actions so as to provide
feedback to the problem-solver, based on the success or failure of the actions.
The AFC is not committed to
any particular relation between the problem solving and the execution. This is
left to the programmer who can choose to follow the traditional sequence of
first generating solutions followed by their execution, or a more sophisticated
interleaving of problem solving and execution.
3. CBelieveDB *GetBeliefDB()
This method gives the
problem-solver access to the general knowledge base used by the agent to
perform tasks. See the section entitled
“Examining Your Agents” (below) for more details on its use and content.
4. SetBeliefDB(CbelieveDB *)
The internal AFC framework
calls this method to set the BeliefDB in the CproblemSolver class. The
programmer
can also call this method if the instance of the beliefDB ever needs to be
changed or removed.
5. CCommunicator *GetCommunicator()
This method retrieves a
reference to the AFC Communicator to allow for any message that may need to be
passed to other agents in the MAS. The AFC framework sets the Communicator
instance by calling the SetCommunicator method below.
6. SetCommunicator(CCommunicator *)
The internal AFC framework
calls this method to set an instance of the communicator in the CproblemSolver
class. This allows the problem-solving engine to access the communication
facilities of the agent without the need for saving pointers to the main agent
shell. The agent programmer can also call this method in case the instance of
the Communicator needs to be changed or removed.
7. CPSActionCodes *GetActionCodes()
This method provides access
to the action codes that may be used by the agent. This is a pointer to the
CPSActionCodes class (see below).
8. SetActionCode(CPSActionCodes *)
The internal AFC framework calls
this method to set the action codes that may be used by the planner. The base
class for action codes is provided (CPSActionCodes), which has some basic
actions codes that may be called by the agent.
The class CPSActionCodes allows
the programmer to implement actions that the agent can perform. A few actions
are provided that the agent can use to interact with other agents within the
MAS. More actions can easily be added by simply deriving a new action codes
class from CPSActionCodes. The basic actions provided are:
1. char *SendMessageToAgent(char *pszAgentName, char
*pszContent)
This method sends a message
to another agent in the MAS. The return value is a string that indicates the
error message if there was an error in sending the message. The first argument
is the agent name and the second argument is the content of the message.
2. char *CPSActionCodes::SendMessageToAgent(char *,
char *, char *, char*, char*)
This is an overloaded method
that can be used to send a message to an agent with more control over the
header. The arguments are
a. Performative: This is the performative used in the
header.
b. Ontology: This is the ontology descriptor used in the
message.
c. Language: This is the language descriptor used in the
message.
d. AgentName: This is the name of the agent that is the
recipient of the message
e. Content: This is the content of the message.
This example illustrates the
classes and their relationship in a simple agent that uses the facilities
provided by the CProblemSolver class. This agent will be called the
“ReasoningAgent” and will be in a class called CReasoningAgent. While a
traditional agent class can be derived from CBasicAgent, this example will
derive the main agent class from CPlanningAgent. If the RETSINA Agent Wizard is
used to generate the agent workspace in Visual Studio, then the inheritance
will need to be changed from CBasicAgent to CPlanningAgent. The class for our
“Reasoning Agent” will look as follows
#include
"c_afc.h"
////////////////////////////////////////////
// CReasoningAgent Class Definition file used for
Agent
// ReasoningAgent
class CReasoningAgent : public CPlanningAgent
{
public:
CReasoningAgent (char *);
~CReasoningAgent
(void);
BOOL
process_message (char *);
protected:
//
overridden AFC methods
void
handle_parse_args (CCommandLine *);
void
process_create (void);
void
process_init (void);
void
process_timer (void);
};
The constructor of our
reasoning agent will contain the following code:
CReasoningAgent::CReasoningAgent()
{
CMyNicePlanner
*pPlanner = new CmyNicePlanner();
SetProblemSolver(pPlanner);
}
Assuming that our agent uses
a planner called MyNicePlanner, in a class derived from CproblemSolver, the
class for our planner will be as follows:
#include
"c_afc.h"
// CMyNicePlanner Class Definition file
class CMyNicePlanner : public CProblemSolver
{
public:
CMyNicePlanner (char *);
~CMyNicePlanner (void);
// Methods
overridden from abstract parent class
BOOL
GenerateSolution();
BOOL
ExecuteActions();
};
The
GenerateSolution() method of MyNicePlanner will be as follows:
BOOL CMyNicePlanner::GenerateSolution()
{
//TODO:
My nice planning algorithm goes here.
//if
planning succeeds then the resulting plan is
//stored
in some data structure of my choice and
//TRUE is returned.
//if Planning fails then
FALSE is returned
//The belief DB can also
be used while planning
//and that can be obtained
by calling GetBeliefDB()
}
The ExecuteActions() method of MyNicePlanner will be as follows:
BOOL
CMyNicePlanner::GenerateSolution()
{
//TODO:
My Nice Execution Engine goes here.
//Use the plans generated
by the GenerateSolution()
//method to execute them.
//Action can be executed
by selecting appropriate
//from the set of action
codes provided by the AFC.
//This can be obtained
from the GetActionCodes() method.
//Eg. Senda message to another agent as follows
//GetActionCodes()->SendMessageToAgent(...)
}
Deriving
the Agent class from the CPlanningAgent gives the programmer the advantage of
having any incoming message from the agent space passed directly to the
planner. In other words the process_message() method of CPlanningAgent calls
the GenerateSolution() method of the CProblemSolver class every time a new
message comes in from the agent space.
This
allows the agent to immediately reason about any messages that arrive from
other agents in the MAS. If the main agent is not derived from CPlanningAgent
(but from CBasicAgent), then the programmer will need to add code to route the
messages to the problem-solving engine, code that calls
CProblemSolver::GenerateSolution().

In the following example, we
show agents interoperate and negotiate in the process of an auction. This demo
shows how developers, using the AFC toolkit, can deploy a fairly sophisticated
and user-friendly set of agents and scenarios, as applied to a real-world
market setting, without having to develop the underlying agent architecture and
infrastructure. The negotiation protocol as demonstrated in this example is a
simple one, but developers can modify the protocol as the situation warrants
it.
Premises underlying the
demo:
In all the example so far,
we have assumed that you have been running all of the agents and infrastructure
components on a single machine. The ANS, DemoDisplay and agents were compiled
and started in sequence on the same CPU. However, for various reasons,
including limitations of either memory or CPU power, you may need additional
resources to execute all components at once. Since we are building multi-agent
systems, we should be able to distribute the agents over a number of machines.
In this section we will show
you how to setup a number of computers to run your agent system. We will use
three systems to distribute the agents from example 1. Below is an overview of
the intended setup:
![]()
![]()
![]()


In
example 1. we use the following infrastructure components and agents:
1. Agent Name Server
2. DemoDisplay
3. AgentA
4. AgentB
The
list above also indicates the starting order for this particular example. Our
objective is to keep the ANS and DemoDisplay on System C and move Agents A and
B to systems A and B, respectively. We will not need to change the settings for
the ANS and DemoDisplay since they will connect to the machine they reside on.
However, we need to tell AgentA and AgentB to register with the ANS on System
C.
Before
you can edit the configuration of those two agents, the following must be in
place:
1. The AFC must be installed on all host machines
2. You need the IP address of System C.
The
first step is described at the beginning of this manual.
The
second step will need a bit more explanation. Every machine on the network has
an IP address that uniquely identifies that system world-wide. You will need
this address to connect to an ANS on a remote system. Go to the machine that
you have designated System C that holds ANS. If you are running windows NT,2000
or XP start a command shell and type: ipconfig, at the prompt:

In
this case the IP address is 128.2.213.149.
If
you are using the AFC under Windows 95 or Windows 98 then you will need to type
winipcfg to obtain the same information. If you do you will see a dialog box
that looks like:
 As you can see from the screenshot, the IP address
for this particular system is: 128.2.178.76.
As you can see from the screenshot, the IP address
for this particular system is: 128.2.178.76.
Now
that you know the address of the machine that runs the ANS, you will need to
change both AgentA and AgentB so that they use that address to connect to the
lookup service.
Navigate
to the RETSINA directory (on Systems A and B, for Agents A and B,
respectively). You should find a subdirectory called:
Examples\Steps\Step1\AgentA.
In
this directory you should find a .bat file called run.bat. This the generic
name for the start scripts that we use to run our agents. Open that file in a
text editor such as notepad. You do you should see the following text:
AgentA.exe -name AgentA
-port 6673 -ans 127.0.0.1 -ansport 6677 -ddp DemoDisplay
You
should notice that the ans field is set to 127.0.0.1. This address is a
reserved for a local host, i.e., the machine on which the agent is currently
running. If you want to have the agent use a different ANS, you need to fill in
the IP address that we obtained from the steps listed above. Change the IP
address
and save the file. Do the same for AgentB, which you should be able to find
under: Examples\Steps\Step1\AgentB\Debug. Of course, you need to edit
the file for AgentA on system A, and the file of AgentB on system B. Once all
of these files are complete, start the scenario as explained in “Example
One: Agent Communications.”
PART
III: Examining Your Agents
Each agent goes through a
number of phases or lifecycles. These lifecycles are illustrated in the code.
You can use them to activate and manage your agent as it becomes active in a
multi-agent system. What you should notice when you look at the code is that
you are given events at every point in the source. Events are generated for
incoming messages, for timers and even for certain startup procedures. Here is
a brief overview of the events you will see in your agent:
Agent construction.
This is basically your agent
constructor. Use this as you would any normal constructor. Be aware however
that your agent is not network-aware yet.
Method
called: CAgentA ( )
At this point in the agent's lifecycle the arguments for the basic agent have already been processed and you now have the opportunity to handle custom parameters. You are given these parameters in the form of a list of CParameter objects. If you want you an also retrieve the original argument variables by using:
int my_argc =a_commandline->m_argc;
char **my_argv =a_commandline->m_argv;
The method implementation here will show how to use the parameters by
retrieving the arguments one by one. There is an instance of the Communicator
at this point but it is in its initial stages. You can set and unset variables,
but they may be changed by the agent core at a later stage.
Method
called: void handle_parse_args (CCommandLine *a_commandline)
When this event is
triggered, the basic agent will create a number of important objects. For
example, the Communicator object is created and initialized (but not started).
The BelieveDB (belief system) is created and filled with basic information like
agent name and location. All of the core event modules have been created and
assigned to the Communicator. The main agent logfile is created and a timestamp
is set. You can find this file in the system directory under you RETSINA path.
The Communicator has been given a number of lookup modules to assist it in
finding agent locations through multiple sources. (You will learn more about
these technologies in the chapter on Discovery).
Method called: void
process_create (void)
Now that we have all the
components in place internally, we can begin to start the agent. When you have
arrived at this point in the code the following events will have taken place:
a. The Communicator was started and you are now
registered with a lookup service.
b. A number of event modules are now active and have
registered with other agents if applicable. For example. the DemoDisplay module
will have contacted a visualization client or a logging server, depending on
the visualization setup. If a Matchmaker module was configured, it will have
advertised the agent's capabilities with one or more Matchmakers.
Method called: void
process_init (void)
Your agent is running and fully active at this point. There is no one specific
event associated with this stage. Instead, multiple events will be recorded.
Each event indicates that either the environment changed or that a message
arrived from another agent. This is the part of the agent you will be working
with most of the time and it is therefore important that you know how it works.
Method called: BOOL process_message (char *data)
Each agent is given a one
second resolution timer. This timer is triggered for the agent so that it can
do maintenance. For example, it is used by the information agent base code to
trigger monitor queries.
Method called: void process_timer (void)
Your agent has been told to
shutdown. This could have been done through a variety of means, such the user
interface, or through a message from other agents or agent facilities. Certain
emergency shutdowns will also trigger this event. When you arrive at this point
in the agent's lifecycle your agent will still have access to other agents and
agent facilities. Be careful what actions you take when your agent is in this
stage. In such a scenario you might not be able to rely on communications. For
example, your agent may not be able to inform other agents and/or facilities
that
it is going to shut down.
Method called: void process_shutdown (void)
All information regarding
agent location, agent type and advertisements are collected and stored in what
is called the network beliefdb. The network beliefdb is the database that
represents the agent’s beliefs about its environment. This network beliefdb is
a part of the global beliefdb as provided by the AFC.
Remember that the AFC does
not place any restrictions on what a belief should look like. As we will show
in the following example, it only provides means to maintain and manage
beliefs. Understanding the structure of this dataset will greatly enhance the
capabilities of your agent.
First, let's take a look at
a simple code fragment that lists all the agents that your agent is aware of:
//
first find the network beliefdb within the total beliefdb
CBelief *lookup=(CBelief *) BeliefDB->find_element
("lookup");
if (lookup!=NULL)
{
// we know that the lookup table is a list so we can safely
convert
CListBelief *network_lookup=(CListBelief *) lookup;
CLList *services=network_lookup->get_value ();
CServiceInfo *info=(CServiceInfo *) services->get_first_element ();
while (info!=NULL)
{
if (info->get_type ()==SERVICETYPE_MATCHMAKER)
{
AfxMessageBox (info->get_name ());
}
info=(CServiceInfo *) info->get_next ();
}
}
This code will traverse the lookup table
and display a dialog box with the name of an agent or service for every entry
found. As you can see, it does not merely retrieve the name, but a full object
instead. This object, called the 'CServiceInfo', contains information regarding
one particular agent. The public appearance of this class is listed below:
class
CServiceInfo : public CLList
{
public:
CServiceInfo
(void);
virtual ~CServiceInfo (void);
void set_location (char *); // url formatted
void set_location (CURL *); // url object
CURL *get_location (void); // pointer to internal location
void set_expiration (int);
int get_expiration (void);
void set_type
(int);
int get_type
(void);
};
As is apparent, the ServiceInfo class is
derived from the AFC-defined linked list class. This means that the name of the
agent can be obtained by calling get_name ();, since the linked list depends on the CListElement
class, which the lookup modules will use to store the agent name. The reason
for using a linked list as the basis for our class is that every agent might
contain one or more advertisements. That is, we used a linked list so that the
agent can retrieve all of
the advertisements for a particular agent, which are associated with its
name or unique ID.
Each advertisement is added to the list and can be retrieved by using the
standard methods for accessing an AFC linked list. You should also notice that
the CServiceInfo class uses URLs to specify the network location. You will have
to use the access methods within the URL object to obtain parameters such as
hostname and port number. (For more information on the URL object, see the
chapter on tools and utilities). Next we see two methods that will either set
or get an expiration time from the service information object. This expiration
time is given in seconds and is primarily used internally for leasing purposes.
If you want this entry to be persistent regardless of the actual presence of
the agent, then use the access method to set this value to: -1. The last two
methods are used to obtain or change the infrastructure type of an entry in the
network beliefdb. The AFC uses the following defines to identify the role an
agent or service has within an MAS:
#define
SERVICETYPE_AGENT 1
#define SERVICETYPE_MATCHMAKER 2
#define SERVICETYPE_DHARMASERVER 3
#define SERVICETYPE_ANS_SERVER 4
#define SERVICETYPE_DEMODISPLAY 5
#define SERVICETYPE_RECOMA_SERVER 6
The following code is an example of how to use
the service type to find all Matchmakers currently known to the agent:
//
first find the network beliefdb within the total beliefdb
CBelief *lookup=(CBelief *) BeliefDB->find_element
("lookup");
if (lookup!=NULL)
{
// we know that the lookup table is a list so we can safely convert
CListBelief *services=(CListBelief *) temp;
CServiceInfo *info=(CServiceInfo *) services->get_first_element ();
while (info!=NULL)
{
if (info->get_type ()==SERVICETYPE_MATCHMAKER)
{
AfxMessageBox (info->get_name ());
}
info=(CServiceInfo *) info->get_next ();
}
}
As you can see, we re-used the sources from our
first example and added
a simple test on the agent type. If an agent is identified as a Matchmaker, its
name will be displayed in a dialog box.
Method called: ~CAgentA ( )
AFC contains code for
detection of newly arrived agents and detection of agent shutdowns. In order to
enable the function, add the following method in your main path, which will be
called every time the network beliefdb is changed:
virtual
void process_environment_change (void);
In future updates you will be able to get very
detailed information about an agent's view of its environment. For now we will
show you how to learn whether an agent has been recently added to the network
beliefdb, or whether it will be removed shortly, because it is no longer
present on the network.
In the AFC we represent the
description of an external agent in a CServiceInfo class. This class contains
all information needed to use this agent. The network beliefdb is an
enumeration of CServiceInfo instances. For every agent on the network of which
your agent is aware, there will be one such service object. Each of those
objects contains a status parameter, which indicates whether it was recently
created or whether it will be destroyed. If the status flag indicates that the
object was just created, then the agent it represents just arrived on the
network. If the status indicates that the object will be destroyed in the next
main cycle, then you know that the remote agent either crashed or shutdown.
Remember that the removal of an agent is not synonymous with a remote agent
shutdown. Internal leases and expiration mechanisms can also trigger the
removal of a CServiceInfo instance.
Now that you have added to your agent a way of being informed of environmental
changes, you will need a bit of code to investigate what actually happened.
Below is a small example of code that will traverse the network beliefdb and
report on what changes occurred:
//
-------------------------------------------------------------------------
void CExampleAgent::process_environment_change (void)
{
debug ("process_environment_change ()"); // just so we can see
where we are
if (state!=__AGENT_STATE_RUNNING__)
{
debug ("Agent not ready yet to process environment changes");
return;
}
// search through the network beliefdb to see what happened
CLList *network_db=obtain_network_db (); // this is an AFC core method
if (network_db!=NULL)
{
CServiceInfo *service=(CServiceInfo *) network_db->get_first_element
();
while (service!=NULL)
{
if (service->get_new ()==TRUE)
{
// this agent just arrived
}
if (service->get_gone ()==TRUE)
{
// this agent just left and the entry will be removed after
the
// method exists
}
service=(CServiceInfo *) service->get_next ();
}
}
else
debug ("No network belief db available");
}
// -------------------------------------------------------------------------
As you can see from the code above, you can
obtain the state of a service and see if it will be removed. If you want to
have a service object forcefully removed, then call the following method:
service->set_gone
(TRUE);
Keep in mind, however, that this is only a hint
towards the management system
that maintains the internal state of the network belief db. If a remote agent
indicates that it is still alive, a new CServiceInfo instance will be created.
(You can try to change your agent’s mind about its external environment, but
you cannot get it to permanently deny the reality of other agents that actually
exist).
The addition of the
'process_environment_change' method will also allow
you to add more refined awareness of the coming and goings of infrastructure
components in a multi-agent system. For example, your agent may want to
register with every Matchmaker that it becomes aware of. The following code
demonstrates how to learn whether or not a new Matchmaker has started somewhere
on your local network:
//
-------------------------------------------------------------------------
void CExampleAgent::process_environment_change (void)
{
debug ("process_environment_change ()"); // just so we can see
where we are
if (state!=__AGENT_STATE_RUNNING__)
{
debug ("Agent not ready yet to process environment changes");
return;
}
// search through the network beliefdb to see what happened
CLList *network_db=obtain_network_db (); // this is an AFC core method
if (network_db!=NULL)
{
CServiceInfo *service=(CServiceInfo *) network_db->get_first_element
();
while (service!=NULL)
{
if (service->get_new ()==TRUE)
{
// this agent just arrived
if (service->get_type ()==SERVICETYPE_MATCHMAKER)
{
// a new matchmaker just arrived
}
}
service=(CServiceInfo *) service->get_next ();
}
}
else
debug ("No network belief db available");
}
// -------------------------------------------------------------------------
The example above only demonstrates that
a new infrastructure component of the Matchmaker type was found. The following
constants will allow you to check for basic infrastructure components:
#define
SERVICETYPE_AGENT 1
#define SERVICETYPE_MATCHMAKER 2
#define SERVICETYPE_DHARMASERVER 3
#define SERVICETYPE_ANS_SERVER 4
#define SERVICETYPE_DEMODISPLAY 5
#define SERVICETYPE_RECOMA_SERVER 6
#define SERVICETYPE_UNKNOWN 7
Now that you know that a new Matchmaker was
found, you may want to register with it. The following example uses the same
code as listed above but adds the capability to register a new client with the
Communicator.
//
-------------------------------------------------------------------------
void CExampleAgent::process_environment_change (void)
{
debug ("process_environment_change ()"); // just so we can see
where we are
if (state!=__AGENT_STATE_RUNNING__)
{
debug ("Agent not ready yet to process environment changes");
return;
}
// search through the network beliefdb to see what happened
CLList *network_db=obtain_network_db (); // this is an AFC core method
if (network_db!=NULL)
{
CServiceInfo *service=(CServiceInfo *) network_db->get_first_element
();
while (service!=NULL)
{
if (service->get_new ()==TRUE)
{
// this agent just arrived
if (service->get_type ()==SERVICETYPE_MATCHMAKER)
{
// a new matchmaker just arrived
CMatchMakerClient *mm_client=new CMatchMakerClient
(service->get_name
(),BeliefDB,Communicator,0);
Communicator->add_display (mm_client); // this will
add it as a custom
client
mm_client->set_logger
(DemoLogger); // make sure we can log to disk
mm_client->parse_args (m_argc,m_argv); // allow the
client to process
out custom settings
// The following methods are normally called by the
Communicator, so
// be careful !! They will start the client and add it
to the agent's
internal management
mm_client->change_state (__CREATE__);
mm_client->set_registered (FALSE);
}
}
service=(CServiceInfo *) service->get_next ();
}
}
else
debug ("No network belief db available");
}
// -------------------------------------------------------------------------
A couple of notes on the code above. First of
all, you probably noticed that there is no advertisement assigned. In this
example we assume that you use the default "adv-schema.txt" file in
the agent's directory. Secondly, you can see that there is a fair amount of
additional management you need to do to actually add the module to the agent.
In future versions of the AFC, the code above will be replaced by a single API
call and the above example will be reserved for situations in which you want to
add custom clients to your agent.
In the previous section you
may have noticed a line in the example code that looked like:
if
(state!=__AGENT_STATE_RUNNING__)
{
debug ("Agent not ready yet to process environment changes");
return;
}
Each agent will go through a number of
states during its execution life-cycle. These states dictate what events can
occur within the agent and they also drive a number of important events. The
events currently defined within the AFC are:
#define
__AGENT_STATE_CONSTRUCTOR__ 0
#define
__AGENT_STATE_INIT__
1
#define __AGENT_STATE_CREATE__
2
#define __AGENT_STATE_RUNNING__ 3
#define __AGENT_STATE_SHUTDOWN__ 4
#define __AGENT_STATE_DESTRUCTOR__ 5
#define __AGENT_STATE_TOP_LEVEL_END__ 6
The current state of your agent can be obtained
by examining the 'state' variable present in every class derived from
CBasicAgent. Each state is set after certain methods are completed. You will
have seen these methods described earlier in the manual.
The state variable is a block of memory that is protected by the agent core.
You can set the state yourself by defining a new state:
#define
__MY_AGENT_STATE_TOP_LEVEL_END__ __AGENT_STATE_TOP_LEVEL_END__ + 1
This code will define a new state, which you
are free to use if the top-level state is in: __AGENT_STATE_RUNNING__ If the agent detects that a state is set to a custom
setting in a top-level state other than
__AGENT_STATE_RUNNING__, then the agent
will forcefully change the state. It does this to protect numerous internal
modules that maintain your agent. For example, the garbage collector (that is
responsible for cleaning up the network belief db) will behave with slight
differences in each of the top level states.
Normally you would look at the network beliefdb
to get an overview of what agents are registered on the network. Sometimes
however, you may want to forcefully refresh the lookup table to be absolutely
sure that all the registrations are valid. You can call the following method
from within your agent:
if
(Communicator!=NULL)
Communicator->listall_agents ();
Remember that this method resides in the
Communicator and you will therefore have to obtain a pointer if you want to
call the method outside of your main agent class. When you call the method
listed above, a number of things happen simultaneously. One, the Communicator
locks the network beliefdb. You will not be able to directly modify any entries
in that area of memory. Two, the Communicator will iterate through all
registered lookup modules and activate their 'list-all' method. If you have all
types of lookup mechanisms enabled and if the agent has instantiated multiple
copies of these modules (one for each active infrastructure component e.g.,
multiple ANSs), then it might take quite some time for the 'listall_agents'
method to return. Also, certain lookup methods will not wait for a direct reply
but instead assume that answers to lookup requests will come in asynchronously.
This may result in environment updates being generated for every agent that was
found through this asynchronous mechanism. See Section 1 for information on how
to process environment updates.
The AFC provides a number of
mechanisms do facilitate persistent connections. This capability was previously
undocumented since it had not passed tests that were successfully completed on
the core AFC code. The persistent connection code is stable enough to be used
by outside developers. Here we will
demonstrate the steps to take to set up a persistent connection.
The client class is one of the mechanisms available to developers to create a
persistent dialogue with other agents. This class represents the base class for
all classes involved in setting up registrations with other agents. For
example, the AFC uses the client class as the basis for interactions with
middle-agent clients. These clients advertise the agent's capabilities with a
middle agent. First, we will examine the basic client class and its
capabilities:
class
CClientBase : public CLogFacility
{
public:
CClientBase (char *,
p;
CBeliefDB *,
p;
CCommunicator *,
p;
unsigned int);
void set_ontology (char
*);
char *get_ontology (void);
void set_performative (char *);
char *get_performative (void);
void set_language (char
*);
char *get_language (void);
void set_create_string (char *);
char *get_create_string (void);
void set_destroy_string (char *);
char *get_destroy_string (void);
};
There are three important sections to be
mentioned in the class definition above.
A. Constructor
B. Envelope Configuration
C. Event Configuration
A. Constructor
The constructor takes a number of pointers to objects it needs to function
independently in the background. The first parameter is a string that holds the
name of the agent with which you wish to have a persistent connection. Next is
a pointer to the BeliefDB, which can be obtained from within your agent code.
Then, there is a pointer to the Communicator, which can also be obtained from
any class derived from CBasicAgent. The last parameter is a flag that is used
by the base class under certain conditions. This last parameter can be safely
set to 0.
B. Envelope configuration
When your agent uses the object that results from using the client classes, it
will ask the client to send messages at specific times. When a message is sent
by your client module it might need additional
information such as a performative and/or ontology etc. There are three methods
available to configure these message settings. By default the following methods
are called if no other preferences are specified. Every time your client module
sends out a message it will use these variables:
set_performative
("tell");
set_ontology ("default-ontology");
set_language ("default-language");
C. Event Configuration
Now that you know the basic functionality, we need to use it and assign it to
an agent. All events are handled by the basic agent code. This means that at
certain times, in response to external events or internal signals, the basic
agent will generate events. All clients must be able to respond appropriately
to these events to ensure proper functionality at all times. As we have written
above, there are a fair number of events that can be generated at any time
during an agent's execution lifecycle. It is important to recall the basic
events, since you will see them occur when you start to build your own derived
client classes or log modules:
#define
__IDLE__ 0
#define __PLANNING__ 1
#define __ADVERTISE__ 2
#define __CREATE__ 3
#define __DESTROY__ 4
There are a number of additional methods that
you will need to know if you want to add more detailed interaction between the
agent and your client module:
public:
virtual BOOL change_state
(unsigned int);
virtual void process_timer (void);
virtual void process_message (char *,int);
virtual void process_create (void);
These methods are actually derived from the CLogFacility class and are used within your client for
maintenance and connection management. When the basic agent generates a __CREATE__ event, the method 'change_state' is called in your client module to indicate that it
will need to register with the server (middle agent for example). If a __DESTROY__
event is detected, the client module
will be notified again using the 'change_state' method, but this time it will trigger the unregister
method.
At this point, we advise
against overloading the four methods listed above, at least until you are
familiar with the workings of the CLogFacility class. We've included the detailed information here
to give you better insight into the inner workings, in case things go wrong in
your agent. You should be able to determine from the logfile the state that the
agent is in and how your client is responding to those events.
Below is sample code that demonstrates how a client module can be assigned to
an agent. We advise that you do this in the 'process_create' method, but it can be added at any point if the
agent is in either the '__AGENT_STATE_CREATE__' state or the
'__AGENT_STATE_RUNNING__' state.
void
CExampleAgent::process_create (void)
{
CClientBase *client=new CClientBase
("Server",BeliefDB,Communicator,0);
client->set_create_string ("(register)");
client->set_destroy_string ("(unregister)");
client->set_logger (DemoLogger);
client->parse_args (m_argc,m_argv);
Communicator->add_display (client);
}
The following steps were taken in the
code above:
1.
CClientBase
*client=new CClientBase ("Server",BeliefDB,Communicator,0);
Create a new client and provide it with the
proper parameters. In this case the client will try to connect to an agent
called 'Server'. The BeliefDB and Communicator pointers were obtained from the
basic agent and the last parameter was set to 0.
2.
client->set_create_string
("(register)");
client->set_destroy_string ("(unregister)");
We now configure the subscription and
unsubscription behavior by providing a registration string and unregistration
string. These two strings will be sent within the content field of the actual
messages. The client will trigger subscription and unsubscription events when
it detects that its agent either shuts down, crashes or boots.
3.
If you want your client to log messages to the global logfile then you may want
to add the following line of code to the agent:
client->set_logger
(DemoLogger);
This code will allow you to call the 'debug'
method if you decide to overload the base client to build more refined classes.
4.
client->parse_args
(m_argc,m_argv);
If you want to process command line arguments
within your class, or if you know that the client class takes specific command
line parameters, then you will need to call this method in the client. This
method is a virtual method and can be used in your own overloaded classes to
process specific parameters for your class.
5.
Communicator->add_display
(client);
This code will tell the Communicator that there
is a new client module that needs to be added to the total list of background
client modules. In doing this, you make sure that your client's background
management code is called at appropriate times.
From this point, you do not have to manage the client; the basic agent will do
this for you. The agent's core code also takes care of deleting the object when
your agent shuts down; you should not do so.
Open-network MASs face
security threats from malicious agents. These agents may try to unregister
their competitors from Agent Name Servers and Matchmakers, eavesdrop on
supposedly private communications, and spoof other agents and agents and the
humans who deploy them. System integrity demands that agent users be held
accountable for problems caused by misbehaving agents.
While in a future release of
our ANS, the security architecture we are developing will counteract these
threats by binding each agent to a unique Agent ID (or AID) (see JavaANS), in
the current release of the AFC agents and ANS, we rely on the integrity of the
agent users in the community to prevent such malfeasance.
To prevent agent spoofing or
masquerading, we require that agent users adhere to a strict naming convention
that links their agents to themselves and the originating domain of their
agents. For example, for an agent deployed by Mike R. on the machine “areolis,”
from the “cimds” center of the Robotics Institute at Carnegie Mellon University,
the agent name would be
miker.areolis.ri.cimds.cmu.edu
Note that the agent need not
be running at this location. The agent name is merely used to signify that the
agent user’s name and originating domain, not the location at which the agent
is running. The user might start the above-named agent on a different computer,
in a different center or department, or at another university, for
example. As long as the user remains
primarily connected with the referenced domain, the agent name should be the
same.
Additional agents would be named “mike2,” “mike3,” etc. The agent name is thus
more like a “birth certificate” than it is an address.
In order to ensure the
unique identity of agents before a security system is accepted and fully
integrated into the agent communities, it is necessary that all agent users
adhere to the above-referenced naming convention. This is especially the case
for those users/agents enabling Discovery of/by other agents and agent systems.
(See section on Discovery for enabling/disenabling Discovery).
The other users of the agent
community will regard users who choose to ignore or subvert the agent naming
convention as hostile and will treat them accordingly. Users who purposefully
unregister or register agents not belonging to them will also be regarded as
hostile to the agent community.
We have added an additional
command line parameter to the BasicAgent, which will allow you to make your
agent name unique. If you start your agent the normal way then the name you
specify on the command line or hardcode in your agent will be used in
registrations 'as is'. However, if you specify the following parameter:
-unique yes
then the agent will append a globally unique ID to your agent name and use that
during it's execution life-cycle.
PART
IV: VISUALIZATION TOOLS

No development environment or toolkit is
complete without its set of testing utilities. The RETSINA architecture has its
own set of tools, one of which is the KQML message-sending tool. This tool
allows you to send customized messages to an agent and to examine the
responses. Besides the basic message sending and receiving functionality, the
tool offers testing sets to test the RETSINA visualization system and Agent
Name Servers.
Open the KQML Message GUI
Sender (RETSINA/tools/…). When starting
the tool you will see one window appear (Figure 1). This window represents the
main functionality of every agent in your system.
The window is divided into
three main areas dedicated to specific agent tasks. The top portion is
dedicated to message generation and message inspection. In the middle you can
see the controls available to manage and work with an Agent Name Server.
Finally there is the visualization tool set at the bottom. Each of those areas
will be discussed in detail in the following sections.
Figure 1

Before you can use any of
the other tools you will need to register the application with an Agent Name
Server. You will not be able to use the
message tools or visualization tools before the application has successfully
registered itself with one of the ANS servers. (See the documentation of “ANS
Version 2.7” in: RETSINA/documentation/Java ANS Manual for more information about ANS).
 In the next 5 steps we will demonstrate how to
configure the message sender to represent an agent and register it with an ANS.
In the next 5 steps we will demonstrate how to
configure the message sender to represent an agent and register it with an ANS.
![]()
First of all we need to give
the application a unique identity. This identity is composed of a unique name
and a local listening port number. (Note: See previous section, “Agent User
Behavior and Agent Naming Conventions,” to name agents for other than local
use. The following example is of an agent for local use only). The listening
port does not have to be globally unique, but you cannot use the same port as
other
applications on your machine. By default the port is set to 6678.

In this example we set our
agent name to AgentA, as shown in Figure 3.
![]()
Next we select an Agent Name
Server from the dropdown menu in the ANS part of the window. In the following
figure we set our ANS to ‘kriton.cimds.ri.cmu.edu.’ If all the parameters are
properly set the

application should be able to
register. Click the “Register” button in the ANS pane to activate the
registration process. If the action is successful, you will see that the
certain fields will be grayed out.

If an error occurs you will see a message in the status bar at the bottom of
the window and a dialog box will appear informing you of the specifics of the
failure.
Most failures in registration
occur because the listening port that was specified is already in use by
another agent. Simply change the port number and try again.
Figure 5
![]() Once you are registered with an ANS, you can retrieve
a list of all the agents registered. Click on the “List All” button to start
the action. Successful retrieval allows you to see a list of agents in the drop
down box on the right side of the ANS pane. Figure 5 shows an example list
retrieved from kriton.cimds.ri.cmu.edu. A shortcut is provided to choose a
receiving
agent from the agent list. Select one of the agents from the drop-down menu and
click “Make Receiver”. This puts the name of the agent in the receiver slot in
the message pane.
Once you are registered with an ANS, you can retrieve
a list of all the agents registered. Click on the “List All” button to start
the action. Successful retrieval allows you to see a list of agents in the drop
down box on the right side of the ANS pane. Figure 5 shows an example list
retrieved from kriton.cimds.ri.cmu.edu. A shortcut is provided to choose a
receiving
agent from the agent list. Select one of the agents from the drop-down menu and
click “Make Receiver”. This puts the name of the agent in the receiver slot in
the message pane.
In this section we will
demonstrate how to send messages to other agents. As we have mentioned above,
the top part of the application’s window is dedicated to message sending and
receiving. On the left are controls to create the messages and on the right are
two message boxes that will show different views of the messages coming in.

In the instructions that
follow we assume that you have registered at least two agents with an Agent
Name Server, and that you have launched at least two Win32KQMLCenter
programs. You will have at least two Win32KQMLCenter
windows open and operating, in order to send and receive messages from one
agent to another. See the previous section on registering agents for more
information.
![]()
![]() Choose one Win32KQMLCenter window to send a message
to another agent.
Choose one Win32KQMLCenter window to send a message
to another agent.
Configure the
"KQML" Section to send a message to another agent. The
"KQML" Section consists of the following fields as shown in Table 1:
| Performative | The set of permissible
operations that agents may attempt on each other's knowledge and goal stores.
Examples include: "tell," "send" and "insert." |
| Receiver | The name of the agent that
will receive the message. |
| Content | The content of the
message. |
| Reply-with | A string of automatically
generated characters. Each message generates a unique identifier. Pressing
"generated string" will generate a different message ID. |
| In-reply-to | A blank field for entering
a message's unique identifier. This field can be used to reply to specific
messages. |
| Ontology | The ontology that the
agents will use to communicate. Examples include: "satellites" and
"stocks." |
| Language | The type of parsing
language (e.g. gin 1.0) that the agents will use. |
| blank template | A menu for selecting
different kinds of generic messages (e.g., advertisements). This menu item is
not implemented. |
| send message | The button that sends the
message to the agent specified in the "Receiver" field. |
Table 1
The required fieldsare: Performative, Receiver, and Content. The optional fields are
Reply-with, In-reply-to, Ontology, Language and blank template. The default
settings for the optional fields are sufficient to test message formats to
agents.
 At this point you can click the “Change State”
button. This will transmit the state-change to the visualizer. Keep in mind
that the Win32KQMLCenter does not keep track of what state you sent previously.
So it is possible to send two CREATE states in a row. Two buttons are included
as shortcuts to quickly send those states without having to select a state from
the drop-down list.
At this point you can click the “Change State”
button. This will transmit the state-change to the visualizer. Keep in mind
that the Win32KQMLCenter does not keep track of what state you sent previously.
So it is possible to send two CREATE states in a row. Two buttons are included
as shortcuts to quickly send those states without having to select a state from
the drop-down list.
Scattered across the
application’s window are a number of small tools that can give you information
about the environment and the internals of the application. Figure 11 shows
three buttons that are used to display system information about the software
that was used to build the message tool. It is available in every agent and was
designed to obtain low-level information about an agent’s state and condition.

Figure 12 is the
Communicator info window. It can be used to quickly obtain your network
settings like IP address and local listening port. When reporting a bug within
the Agent Foundation Classes or Communicator code, please provide the version
number listed in this dialog box.
PART V: Data Structures, Tools and Utilities
The Agent Foundation Classes
support all basic concepts of software engineering. A variety of well-known
structures and concepts are provided with agent development in mind. In this
section, we will introduce each of the provided data structures and demonstrate
how to use them. We will also show how they fit into the agent paradigm and
what other important tools within the AFC depend on them.
First of all, we need to
describe and explain a basic concept of the AFC, known as the CListElement. The
name is deceiving; the CListElement is not an element designed to be used in a
list. In fact, it is used as the basis of virtually every class within the AFC.
While there are a number of other classes beneath the CListElement class, they
are designed to support properties such as Agent DNA and introspection, or
properties considered to be the in the “future” of agent “functioning.” You
might encounter some of these classes, but at this point in time, you can
safely substitute CListElement for their class names. The CListElement supports
a number of elementary methods used by all classes derived from it. These
methods are:
CListElement
*get_parent (void);
void set_parent (CListElement *);
CListElement *get_next (void);
virtual
void set_next (CListElement *);
CListElement *get_last (void);
void set_last (CListElement *);
void *get_content (void);
virtual
void set_content (void *);
virtual
BOOL from_string (char *);
virtual
char *to_string (void);
Most of the methods are pure
virtual functions and are only useful when called from derived objects. As you
can see, the first six methods within the class provide access to pointers of
other objects of type CListElement. In total, the class supports three
pointers:
These pointers are private
and can only be obtained and changed through the access methods. All point to
objects of the same CListElement type.
Following the access methods
are two methods to manage a content pointer. The actual content is not stored
in the object but rather a pointer to the location of the content. This means
that when a CListElement object is destroyed the memory that the object points
to will not be freed-up. You will have to manage this memory yourself. However,
certain classes derived from CListElement cast this pointer to specific data
types that are destroyed when the destructor is called. The CParameter class,
for example, assumes the content pointer points to a string.
The last two methods are the
basis of what we call Collapsible Data Structures. These methods enable an
object to collapse itself into an ACL-formatted string. The methods can also be
used for recreating the object itself from a string. For now it is important to
know that every class derived from a CListElement has this behavior.
There are two more important
methods that define the basic behavior of the CListElement. These methods are
not listed above because they are inherited from the CDNA class. However for
all intents and purposes they are part of the CListElement. The declaration of
the methods is as follows:
void set_name (char *);
char *get_name (void);
Every class has a label that
can be accessed by these methods. It is not always necessary to give an object
a label and omitting one will not interfere with the functioning of the object.
The label/name is stored as a private string and cannot be accessed directly.
Certain derived objects will not allow you to change the label once it has been
set by the constructor. This characteristic protects the persistence of certain
objects.
There is one final method
that can be used to obtain certain low-level information about the object. If
you decide to construct your own basic types then you will have to become
familiar with the other methods that related to this set of functions:
int get_btype (void);
Every object in the AFC has
a base type. This is either a namespace string or a numerical ID. In the cases
of the most fundamental types, a number expresses the type. The method above
can be used to obtain this type. There is a finite set of types defined by the
AFC, which lists the most basic types of data-structures. These are:
#define
__DATA_ELEMENT__ 0
#define
__DATA_TREEELEMENT__ 1
#define
__DATA_LIST__ 2
#define
__DATA_QUEUE__ 3
#define
__DATA_STACK__ 4
#define
__DATA_TREE__ 5
#define
__DATA_TREELIST__ 6
#define
__DATA_HASH__ 7
#define
__DATA_TOKEN__ 8
#define __DATA_PARAMETER__ 9
Now that you have some
familiarity with most basic component of the AFC, we can continue with the
first composed data structure: the linked list. The AFC provides a linked list
called CLList, which is specifically designed for agent technology. Let’s take
a look at the public methods of this class:
CListElement *add_element (CListElement *);
CListElement
*find_element (char *);
CListElement *get_element (int);
void delete_element (CListElement *);
void delete_element_by_name (char *);
void remove_element (CListElement *);
void remove_element_by_name (char *);
void delete_list (void);
CListElement *get_last_element (void);
CListElement *get_first_element (void);
CListElement *get_previous_element (void);
CListElement
*get_next_element (void);
int get_nr_elements (void);
virtual
void insert_element (CListElement *,unsigned int);
virtual
void insert_element_after (CListElement *,CListElement *);
virtual
void insert_element_before (CListElement *,CListElement *);
void dump_list (void);
void tokenize (char *,char);
The constructor for the
CLList class is of the same nature as the CListElement. In fact, the linked
list is derived from the CListElement. The benefit of this derivation is that
you will be able to insert lists into lists, etc.
BOOL has_children (void);
void set_children (CLList *);
CLList
*get_children (void);
void set_parent (CLList *);
CLList *get_parent (void);
Another component similar to
the CListElement is the CTreeElement. This element can be used in binary trees,
but also in combination with other structures, to mix and match into a final
custom data representation.
CTreeElement
*get_parent (void);
void set_parent (CTreeElement *);
CTreeElement *get_left (void);
void set_left (CTreeElement *);
CTreeElement *get_right (void);
void set_right (CTreeElement *);
CTreeElement *find_element (char *);
As can be seen from the
listing above, the tree element is designed to be used in a binary tree. (We do
not provide more complex trees and tree representation, since we do not want to
dictate to developers what these structures should look like).
Every tree element contains
three nodes of a similar type, to represent the tree. These are:
- A parent node
- A left leaf node
- A right leaf node
Each of these nodes can be individually
assigned and retrieved. Under most circumstances, however, the tree classes
will take care of assignments. Of course, all the methods available in the
CListElement class are available in this class. The ‘find_element’ method can
be used stand-alone (if no tree structure is used), but is designed to be
called by the CTreeList and Ctree, since they offer fully implemented search
mechanism.
void set_root (CTreeElement *);
CTreeElement *get_root (void);
CTreeElement *find_element (char *,int);
Finally there is the CTree class, which
represents the actual implementation of a binary tree. The CTree class is
derived from the CTreeElement class, and as can be seen from the figure above,
there are only three public methods. First of all, there is a method that can
be used to set a pointer to the root element within the tree. This root element
is of type CTreeElement. Next, an access method can be seen to obtain the
current root. Last, we have the method that can be used to search the tree for
an element with a certain label. The tree class can use two search mechanisms:
breadth first and depth first. The ‘find_element’ method takes two parameters,
a string containing the label which will be searched for and a flag indicating
the search mechanism. Please use one of the two flags to indicate which search
algorithm is to be used:
#define
__TREE_BREADTH_FIRST__ 0
#define
__TREE_DEPTH_FIRST__ 1
Two other commonly used datastructures are available, the queue and the stack. Each of these classes are based on the CLList class and will therefore have all the functionality of that class. First let’s take a look at the queue termed CQueue in the AFC. Only four methods are needed to turn an AFC list into a queue. We need a way of fixing the size of the queue and we need to add and remove elements from the queue. The figure below shows all four methods and their declaration.
void set_size (int);
int get_size (void);
BOOL enqueue (CListElement *);
CListElement *dequeue (void);
Be aware that changing the size of an
existing queue containing a number of elements might produce unwanted effects,
if the size of the new queue is smaller than the number of elements currently
present in the queue. By default, the queue size is set to 100 from with the
CQueue
constructor.
An interface similar to the
queue is used for the stack. Different methods define the behavior of this
datastructure, although common methods include the ‘get_size’ and ‘get_size’
access functions. The figure below shows the methods within the CStack class,
and their interfaces.
void set_size (int);
int get_size (void);
CListElement *pop (void);
BOOL push (CListElement *);
Characteristic for this class are the pop and push methods, which add and
remove elements from the stack. The CStack class uses the same size concept to
determine the maximum size of this object. For this class, the same size
default is used and set to 100 within the constructor.
In this section, we will
discuss a number of tools available within the AFC libraries that considerably
facilitate agent-based development.
The Agent Foundation classes fully support the
generation of Globally Unique Identifiers (GUIDs). When you created your agent
with the AFC Wizard, the AFC headers were incorporated in your agent, which
automatically gave your agent GUID capability. Here is an example on how to
generate a GUID:
#include "c_afc.h"
CGUID *uuid=new CGUID;
printf ("Newly generated ID:
[%s]\n",uuid->get_guid ());
delete uuid;
You can use an object instantiated from the CGUID class as a placeholder for
one ID, or you can use the object to keep generating new ones. In the following
example, we show how to generate 10 IDs:
#include "c_afc.h"
CGUID *uuid=new CGUID;
for (unsigned int i=0;i<10;i++)
printf
("Newly generated ID: [%d][%s]\n",i,uuid->generate_guid ());
delete uuid;
While it is not useful from a
developer’s perspective, the class also contains a method to set the internal
uuid to a specific string. This was implemented for internal use only. You can
set the internal string by calling:
set_guid (char *);
When using the class you
will notice that the id's the objects generate are like Windows registry keys.
This was done intentionally because it is much easier for a developer to strip
the outer parenthesis than it is to add them after the string has been created.
Let's take a look at an example on how to convert a GUID to a general uuid
string:
#include "c_afc.h"
CUtils utils;
CGUID *uuid=new CGUID;
printf ("Newly generated ID:
[%s]\n",uuid->get_guid ());
char *stripped=uuid->get_guid ();
printf ("Stripped ID:
[%s]\n",utils.remove_curly_brackets (stripped));
delete uuid;
The output of this code
should look something like this:
Newly generated ID:
[{8D831E25_1DEE_11D5_A944_F95168027CA4}]
Stripped ID: [8D831E25_1DEE_11D5_A944_F95168027CA4]
An agent is an abstract
concept. However, it will have to be written using concrete programming
structures, and will have to live in an operating system. Making an agent
OS-survivable can present a number of problems, most of which can likely
handled by the AFC utilities. The AFC includes some low-level tools to allow
agents to work within their environment. These will also compile under Unix.
Here are a couple of examples of what is available.
Note: Make sure you include the following statements in
your code:
#include "c_afc.h"
CUtils utils;
Obtaining the RETSINA
variable and home directory of the agents
As you may have noticed, the
RETSINA agents depend on an environment variable called RETSINA. This variable
points to a directory where agents will find crucial information. At times, an
agent might want to “manually” find certain resources from a directory below
the RETSINA path. The code fragment below demonstrates how to obtain the total
path from the RETINSA variable.
char *home=utils.get_home ();
if (home==NULL)
printf
("The RETSINA variable was not set\n");
else
printf ("The location of the RETSINA path is: [%s]\n",home);
In the AFC, we provide a
number of tools to work with files and directories. From low-level support to
virtual file-system layer classes, the AFC should enable you to develop agents
that do not depend on low-level external classes and libraries.
A basic operation could be
to list the files of a directory. Below we give an example of how this can be
done using the AFC.
CLList *filelist=utils.file_list
(".","*.txt");
if (filelist==NULL)
{
printf
("Unable to find any files in specified directory");
return;
}
CListElement *temp=filelist->get_first_element
();
while (temp!=NULL)
{
printf
("file: [%s]\n",temp->get_name ());
temp=temp->get_next ();
}
delete filelist;
The benefit here is that the
files are stored within a CLList as CListElements. You can use the tools that
operate on these objects to accomplish more complex tasks.
We’ve separated the listing
of files from the listing of directories to rule out any confusion about what
is maintained in the listing. Also, the AFC has to compile on a variety of
platforms, and not all platforms support a physical file-system; a directory
listing may mean something completely different on a mobile phone. The example
below demonstrates how to obtain a listing of all sub-directories in the
current directory.
CLList
*dirlist=utils.dir_list (".");
if
(dirlist==NULL)
{
printf ("Unable to find any files in specified
directory");
return;
}
CListElement
*temp=dirlist->get_first_element ();
while
(temp!=NULL)
{
printf
("file: [%s]\n",temp->get_name ());
temp=temp->get_next ();
}
delete
dirlist;
Now that we can find out
what files and directories are located in a certain path, we might want to open
and load a file. The code below demonstrates how you can use a CFileBuffer
class to read in a text file, after which you can access the individual
characters:
CFileBuffer filebuffer;
char
*buffer=filebuffer.load_a_file ("data.txt");
if
(buffer!=NULL)
{
printf
("Contents of file is [%s]\n",buffer);
}
else
printf
("Unable to open file");
delete
filebuffer; // this will also delete the contents of buffer
The CFileBuffer class (shown
above) may seem a bit strange at first. It is the first version of a class that
will be managed by something called CIOBuffer. This class will present a
virtual io layer to the agent, which allows it to load resources using URL's.
The CIOBuffer will then instantiate the appropriate base class to do the actual
work.
The AFC contains tools and
utilities that are not necessarily designed for agents but will nonetheless
assist and expedite development and research. In this section we will explain
how to use the CDBFileIO class, with the accompanying class: CDBRecord. These
tools were initially designed to give agents quick access to flat text-based
database files. One of the later versions of the C++ used these classes to
maintain a permanent cache file of known agent registrations for persistence
purposes. Later, when the AFC started adopting the 'to_string' and 'from_string'
technologies, another capability was added. Every database record and every
database using those records can be collapsed into an ACL formatted string,
which can be sent to another agent and expanded into an internal
data-structure.
Before we explain how the
database class works, we need to demonstrate how a record is defined and used
within the AFC. The public appearance of this class is:
class
CDBRecord : public CLList
{
public:
CDBRecord (void);
virtual ~CDBRecord (void);
BOOL from_string (char *);
char *to_string (void);
};
As you can see, the basic record class does not
contain any specific references to data types held within the record. It does
not contain an index either. The class listed above was designed to allow
developers to construct their own records. Currently, the record assumes that
its contents are a list of CListElement objects (See documentation on the
CListElement class, above). The record uses the 'name' variable to store the
content of a record field. No translation or casting is done on the data and
the developer is responsible for refining this behavior. As you can see we have
two ACL management methods defined in the record class:
BOOL
from_string (char *);
char *to_string (void);
You can use the 'from_string' method to fill a
new record with data from an ACL formatted string. Any existing data within the
record will be deleted. Here is an example of what this might look like:
CDBRecord
*record=new CDBRercord ();
BOOL ret=record->from_string ("(record :element (first) :element
(second))");
if (ret==FALSE)
printf ("Error expanding ACL string");
else
printf ("Successfully filled record");
After the operations listed above the
contents of the record would be:
"first"
"second"
When you want to send the contents of a record
to another agent, you can use the code below to collapse the data in the record
into an ACL formatted string:
char
*string=record->to_string ();
if (string==NULL)
printf ("Unable to collapse data into ACL string");
else
printf ("Collapsed data into: %s",string);
Now that we have described how a record is
defined, we can proceed with the documentation of the database class. The
public face of this class is defined as:
class
CDBFileIO : public CFileBuffer
{
public:
CDBFileIO (void);
virtual ~CDBFileIO (void);
BOOL load_records (char *);
BOOL save_records (char *);
BOOL from_string (char *);
char *to_string (void);
int get_nr_columns (void);
int get_nr_rows (void);
BOOL add_record (CDBRecord *);
void reset_db (void);
};
As you can see, the constructor does not
take any parameters. Creating an object of this class will create an empty
database. You can either start adding records by hand or load them from a file.
Keep in mind that this particular class is the base class for all databases in
the AFC. As such it represents a flat view of a database. Records are organized
in a matrix representation whereby the first record contains the keys for the
database. To clarify further how this flat database view works, let's look at
an example:
//
create empty database
CDBFileIO *database=new CDBFileIO ();
// create the first record that will hold the list of keys
CDBRecord *record=new CDBRecord ();
// add a number of keys to the record ...
CListElement *key1=new CListElement ();
key1->set_name ("SSNR");
CListElement
*key2=new CListElement ();
key2->set_name ("First Name");
CListElement *key3=new CListElement ();
key3->set_name ("Last Name");
record->add_element (key1);
record->add_element (key2);
record->add_element (key3);
if database->add_record (record)==FALSE)
printf ("Unable to add record to database");
The code shown above sets up a new database
using code. Now that you have a formatted database, you can start adding
fields. This works exactly the same way as adding the keys to the database.
Below is a small fragment that demonstrates this:
//
create the first record that will hold the list of keys
CDBRecord *record=new CDBRecord ();
// add a number of keys to the record ...
CListElement *field1=new CListElement ();
field1->set_name ("123455652");
CListElement *field2=new CListElement ();
field2->set_name ("Martin");
CListElement *field3=new CListElement ();
field3->set_name ("van Velsen");
record->add_element (field1);
record->add_element (field2);
record->add_element (field3);
if database->add_record (record)==FALSE)
printf ("Unable to add record to database");
The database base class as described here was
designed to give agent researchers a quick and easy tool to take their
experimental results and stream them to a database file for future examination.
Interaction with the actual files is achieved through two methods:
BOOL load_records (char *);
BOOL save_records (char *);
We assume here that your files will be dos or
unix text formatted files with TAB separations between columns. Use the
'load_records' method to fill a newly created database object with the contents
of a file. The parameter that this method takes is the name of a file that
holds the database. Subsequently you can save a database by calling the method
'save_records ()' with the name of a file to be saved as a parameter. In the
case you want to flush databases using the last used filename, you can use the
method 'save_records' with no file parameter. This will call 'save_records
(char *)' internally with the name of the last file you saved or opened.
As with most classes in the AFC, you can call
'from_string' and 'to_string' on any database object. Doing so will either
collapse the entire database into an ACL string ('to_string') or will expand a
given string into a filled database (‘from_string’). The declarations of these
methods is:
BOOL from_string (char *);
char *to_string (void);
(Note: If you want to store your database as a
KQML string on disk, you will have to maintain your own file pointers).
After you have loaded or filled a database you
can obtain some basic information from it by using:
int get_nr_columns (void);
int get_nr_rows (void);
These methods ultimately calculate the extend
of the database matrix and return the result.
In case you want to completely clear an
existing database object, you can call:
void reset_db (void);
This will:
The purpose of this class is to store and manage a number of wildcard
descriptions. Matching methods can be used to match a string to a set of
wildcards. The wildcard class does not assume a file system model, although it
can be used for that. Below is the public part of the wildcard class:
class
CWildCard : public CLList
{
public:
CWildCard (void);
~CWildCard (void);
BOOL add_wildcard (char *);
BOOL match (char *);
BOOL match_nocase (char *);
BOOL from_string (char *);
char *to_string (void);
};
As you can see, the class is derived from a
linked list. This allows a wildcard object to store multiple variations of the
wildcard. No additional initialization is needed. Once the object is created,
you can add one or more wildcard definitions. For example:
CWildCard *wildcards=new CWildCard ();
wildcards->add_wildcard ("infoagent*");
wildcards->add_wildcard ("infoentity*");
wildcards->add_wildcard ("info*");
After you have configured the object with a
number of examples, you can give it a string to examine. There are two methods
available to inspect a sample string:
BOOL match (char *);
BOOL match_nocase (char *);
Either method will return TRUE if the string
matches any of the patterns and FALSE if it matches none. Use the second method
to disregard any case matching between wildcards and input string.
As with most AFC classes, you can use the
'from_string' and 'to_string' methods to collapse the data into an ACL
formatted string. In the CWildCard class, these methods are declared as:
BOOL from_string (char *);
char *to_string (void);
The resulting ACL string describes the list of
wildcard patterns stored in that particular object.
It is possible to add your own socket to an AFC
agent. This might be useful in cases where the traffic going through the socket
is of a type not supported by any existing AFC socket. What follows are
instructions for adding a custom socket to your agent.
You will need to create a
new socket class based on one of the pre-defined AFC sockets. The possible
socket base types are:
CSocketBase
// basic TCP/IP socket
CDataGramSocket // modification on the previous one that supports UDP
CMulticastSocket // multicast implementation of CDataGramSocket
The CSocketBase and
CDataGramSocket behave identically and support the same API. For the third
type, you need to add two more methods to configure it:
void
set_group_ip (char *);
char *get_group_ip
(void);
void set_group_port
(int);
int get_group_port
(void);
These methods allow you to configure the
multicast group and port. The AFC already supports multicast, but this socket
is pre-configured to use the UPnP group. In an example below we will
demonstrate how to properly use these methods. But first, there is one more
method that is crucial for a custom socket:
set_sockettype
(__MY_SOCKET__);
This method will identify your socket instance
as a custom socket. Whenever
data arrives on this channel, your agent will be informed through the
CBasicAgent method:
virtual
void process_custom (CSocketBase *);
 Again, make
sure you include the Agent Foundation Classes header and add an object of type
CUtils:
Again, make
sure you include the Agent Foundation Classes header and add an object of type
CUtils:
Since MASs are largely characterized by the use of messages being exchanged between agents in text format, we provide a number of tools to make development easier. The following tools demonstrate utilities to manipulate strings.
When working with KQML or
XML messages, it is useful to know whether or not the content of a field
contains readable characters. You can use the code shown below to determine
whether a string contains white space only.

In the AFC the parser,
classes will use string tools to create strings from lists and lists from
strings. Any CLList object containing objects derived from CListElement can be
expressed in a string, and any string containing elements separated by a
specific character can be expressed in a CLList object. When creating a string
from a list, only the ‘name’ variable within the CListElement object will be
added. Optionally, you can specify a character to be used to separate the list
elements. The code below demonstrates the creation of a list from a string of
elements separated by a ‘.’.
CLList *result=new CLList;
utils.tokenize
("retsina.agent.middleagent.matchmaker",".",result);
CListElement
*temp=result->get_first_element ();
while
(temp!=NULL)
{
printf
("Element: [%s]\n",temp->get_name ());
temp=temp->get_next ();
}
“Tokenating” is the term
used in the AFC to indicate the inverse of tokenizing. This functionality will
generate a string from a pre-filled CLList object.
CListElement *temp=NULL;
CLList *list=new CLList;
temp=new
CListElement ("retsina");
temp=new
CListElement ("agent");
temp=new
CListElement ("middleagent");
temp=new
CListElement ("matchmaker");
char
*result=utils.tokenator ('.',list);
printf
("Resulting string is: [%s]\n",result);
delete list;
// this will delete all elements and the 'result' buffer
An ACL-formatted string encodes assumptions about the contents of the field stored in the string. Let us assume that it does not matter whether or not the fields are stored as uppercase or lowercase, but that the internal matching does depend on uppercase. It may then useful to convert an entire list to uppercase. The following code fragment demonstrates how this can be achieved. The resulting labels of the elements in the list will all be in uppercase.
CListElement *temp=NULL;
CLList *list=new CLList;
temp=new
CListElement ("retsina");
temp=new
CListElement ("agent");
temp=new
CListElement ("middleagent");
temp=new
CListElement ("matchmaker");
char *result=utils.tokenator
('.',list);
printf
("Resulting string is: [%s]\n",result);
delete list;
// this will delete all elements and the 'result' buffer
Below is a fragment of code
you can use to display the contents of the labels of a list:
CListElement *temp=result->get_first_element ();
while
(temp!=NULL)
{
printf
("Element: [%s]\n",temp->get_name ());
temp=temp->get_next ();
}
delete list;
Depending on the situation, you might want to
create a reply_with field. This is a unique string that can be used to uniquely
identify an ongoing dialog with another agent. You can create one such string
with the following code:
char *reply_with=utils.create_reply_with ();
printf
(":reply_with %s\n",reply_with);
delete [] reply_with; // this is not deleted by the object
Normally, you would use the
UUID classes to create this field. However, this method was kept since it is
considerably smaller than the UUID equivalent. The Communicator will
dynamically switch between the two depending on the platform.
Since most agents communicate by exchanging
strings, we provide a number of tools to manipulate and manage agent-specific
strings. Most of the tools were developed to accommodate the easy development
of code dealing with ACL fragments. The following related operations are
available:
char *remove_parenthesis (char *);
char *remove_brackets (char *);
char *remove_angle_brackets (char *);
char *remove_square_brackets (char *);
char *remove_curly_brackets (char *);
char *remove_quotes (char *);
Each
method behaves similarly, but triggers on a different character. The following
example demonstrates how to remove parentheses. The same code can similarly be
used to remove other characters.
![Text Box: char *string=new char [strlen ("(hello
world)")+1];
strcpy (string,"(hello
world)");
char *formatted=utils.remove_parenthesis
(string);
printf ("Formatted string:
[%s]\n",formatted);](./Manual_rev_15_files/image087.gif)
IMPORTANT! The methods
listed above work directly on the strings you provide. This means you cannot
use statically declared strings as parameters. Be careful with these methods
The AFC contains two main
classes to facilitate web-related development: the URL class and a web-socket
class. First, we will show the URL class. Then we move to a web-socket class
that can be used to obtain the contents of a URL or URI. Let us first look at
an example of a simple URL operation:
![Text Box: char formatted_url
[]="http://www.softagents.org:80/index.html";
CURL *url=new CURL;
if (url->parse_url
(formatted_url)==TRUE)
{
printf ("url:
[%s]\n",url->get_name ());
printf
"-----------------------------------------------------\n");
printf ("protcol: [%s]\n",url->get_proto ());
printf
("host: [%s]\n",url->get_host ());
printf
("port: [%d]\n",url->get_port ());
printf
("page: [%s]\n",url->get_webpage ());
printf
("cgi: [%s]\n",url->get_cgi ());
// let's
change the hostname and see what the new url is
url->set_host ("www.excite.com");
printf
("url: [%s]\n",url->get_name ());
printf
"-----------------------------------------------------\n");
printf ("protcol: [%s]\n",url->get_proto ());
printf
("host: [%s]\n",url->get_host ());
printf
("port: [%d]\n",url->get_port ());
printf
("page: [%s]\n",url->get_webpage ());
printf
("cgi: [%s]\n",url->get_cgi ());
}
else
printf ("Unable to parser url");
delete url;](./Manual_rev_15_files/image088.gif) As you can
see, the name of the URL object always contains the completely formatted URL.
You can access the different fields and change them to point the URL to a
different location. Be aware, however, that some of the fields can be set to
NULL. For example, if the URL does not contain a reference to a CGI script,
then you will get a NULL back when you attempt to access that field.
As you can
see, the name of the URL object always contains the completely formatted URL.
You can access the different fields and change them to point the URL to a
different location. Be aware, however, that some of the fields can be set to
NULL. For example, if the URL does not contain a reference to a CGI script,
then you will get a NULL back when you attempt to access that field.
The CURL class is based on
an unfinished CURI class, which is more generic than the URL and does not
understand concepts such as port number and CGI scripts. Now that we have an
object we can use to represent the location of resources on the web, we can
start to use the CHTTPSocket class to retrieve this data. You can provide a
pointer to either a CURL object, or to a string containing the formatted URL.
CURL *url=new CURL
("http://www.softagents.org");
CHTTPSocket *socket=new CHTTPSocket;
char *webpage=socket->retrieve_page (url);
if (webpage!=NULL)
{
printf ("Contents of
[%s]\n",url->get_name ());
printf (webpage);
}
else
printf ("Unable to retrieve webpage");
delete [] webpage;
delete socket;
delete url;
| | JADE | RETSINA | Bee-gent |
| ||
| Objective | FIPA-Standard | Middle agents allow
heterogeneous agent types to interoperate successfully. | To provide a coordination
mechanism for already-existing applications and databases |
| ||
| Version | JADE 2.4 and LEAP 2.0 | AFC SDK 1.15 | Bee-gent 2.1 |
| ||
| Organization | CSELT and LEAP Project | Robotics Institute, CMU | TOSHIBA Corp. |
| ||
| Language | Java | C++,C,Java | Java |
| ||
| Platform / OS | Any platform where Java VM
is available | Windows, SunOS, Linux | Any platform where Java VM
is available |
| ||
| Agent
Intelligence |
| |||||
| Interaction
Protocol | Useful behavioral patterns
are provided. Also, FIPA-defined protocols are implemented in advance. | A specific Interaction
Protocol handling module cannot be found. | IPs are described in UML
state diagram and sequence diagram in the visual editor. Also, some patterns
are provided. |
| ||
| Planning facility | Provided by JESS (Java
shell of CLIPS) | Generic planning facilities
are provided | Provided. It's similar to
JACK. |
| ||
| Reasoning facility | Provided by JESS (Java
shell of CLIPS) | It seems to be there, but
not in AFC SDK. | Provided. It's similar to
JACK. |
| ||
| BDI model | Agents' mental states are
implicitly expressed at the execution of Interaction Protocol. | Belief DB is present for
agents and developers to use. | Provided. It's similar to
JACK. |
| ||
| Agent utilities /
tools |
| |||||
| Naming /
Directory Service | Federated FIPA-DF with GUI | ANS (currently not
federated), UPnP discovery as alternative to ANS | LDAP wrapper is provided. |
| ||
| Others | JSP support | Matchmaker, User profile
management, GPS tool, NLP, Grid display, | Servlet support |
| ||
| Message transport | IIOP (CORBA), Http (SOAP is
not yet), TCP/IP socket for inter-platforms. RMI for intra-platform. SMTP and
WAP are under development. | TCP/IP socket | Http (SOAP is not yet) | | | |
| Security feature
(tampering and leakage of communication) | " Today no security
aspect has been implemented in JADE. Good work is however ongoing and we
expect to introduce security at the end of 2001. " | No specific security
component implemented. Provisions are present for future implementations. | SSL for agent messages and
Toshiba's own encryption algorithm
for mobile agents (not released to public). | | | |
| Safety feature | I cannot find the
description about safety. | I cannot find the
description about safety. | Snapshots of agents to be
taken at any time | | | |
| Mobility support | Possible within a platform | Planned in future versions | Possible | | | |
| Device support | LEAP (a subset of JADE) is
for J2ME-CLDC and pJava. | Smallest agent ever built:
32K for PalmOS | Now implementing for cellar
phones which installed J2ME-CLDC | | | |
| Architectural
feature | FIPA architecture, i.e.,
AMS, DF, MTP, etc. | Containment of Agent Shell,
Agent Container and Modules. Pre-defined Agent Shells are shipped with AFC. | Wrapper architecture.
Stationary agents can wrap the applications and mobile agents go around them. | | | |
| Standard spec. | FIPA | None | FIPA (agent message only) | | | |
| Development,
Monitoring and Management |
| |||||
| Development tools | The following monitoring
agents can be also used for debugging use. | Integrated into Visual C++
6.0 for Windows | Interaction Protocol and Rules
for Planning and Reasoning can be described in the visual editor. | | | |
| Monitoring tools | Platform administration
agent, message inspection agent, and message tracking agent with a graphical
interface. | - MessageCenter allows you
to send custom messages, debug ACL messages, and interact with an ANS.
DemoDisplay allows visualization of agent interaction. MatchMaker Tools allow
investigation of middle agents | Web browsers-based
monitoring and management tool for agent current status and messages (not released to public). | | | |
| Documents | Administrator's Guide,
Programmer's Guide, (lots of) Tutorials, Java API document, FAQ, etc. | AFC Developers Guide | Getting Started, Tutorial,
Tools Manual, Java API document, FAQ, etc. | | | |
| Source code | Yes | No | No | | | |
| Samples | 14 examples (Ping to JESS) | 16 example (GUI agent to
Matchmaker to Auction to Planning) | 11 examples (Hello world to
Planning) | | | |
RETSINA Software License
CARNEGIE MELLON UNIVERSITY NON-EXCLUSIVE END-USER SOFTWARE LICENSE AGREEMENT
RETSINA™
Reusable Environment for Task Structured Intelligent Network Agents(tm)
RETSINA AFC™
RETSINA Agent Foundation Classes™
IMPORTANT: PLEASE READ THIS SOFTWARE LICENSE AGREEMENT ("AGREEMENT") CAREFULLY.
Unpacking, examining, or using RETSINA software and documentation constitutes acceptance of this license agreement.
LICENSE
The CMU Software and Documentation, together with any fonts accompanying this Agreement, whether from a network accessible site (via ftp, http, etc.), on a disk or CD-ROM, in read-only memory or any other media or in any other form (collectively, the "CMU Software") is never sold. It is non-exclusively licensed by Carnegie Mellon University ("CMU") to you solely for your own internal, non-commercial research and evaluation purposes on the terms of this Agreement. CMU retains the ownership of the CMU Software and any subsequent copies and modifications of the CMU Software. The CMU Software and any copies made under this Agreement are subject to this Agreement.
YOU MAY:
1. USE the CMU Software solely for the purposes of personal, academic, and non-commercial purposes.
2. COPY the CMU Software only to one other computer owned by you or under your administrative control if owned by your employer, for the purposes outlined in paragraph (1), above.
3. BACK-UP the CMU Software for safety purposes only. You may make one (1) copy of the CMU Software in machine-readable form for back-up purposes. The back-up copy must contain all copyright notices contained in the original CMU Software.
4. TERMINATE this Agreement by destroying the original and all copies of the CMU Software in whatever form.
YOU MAY NOT:
5. Assign, delegate or otherwise transfer the CMU Software, the license (including this Agreement), or any rights or obligations hereunder or thereunder, to another person or entity. Any purported assignment, delegation or transfer in violation of this provision shall be void.
6. Loan, distribute, rent, lease, give, sublicense or otherwise transfer the CMU Software (or any copy of the CMU Software), in whole or in part, to any other person or entity.
7. Alter, translate, decompile, disassemble, reverse engineer or create derivative works from the CMU Software, including but not limited to, modifying the CMU Software to make it operate on non-compatible hardware.
8. Remove, alter or cause not to be displayed, any copyright notices or startup messages contained in the CMU Software.
9. Export the CMU Software or the product components in violation of any United States export laws.
Title to the CMU Software, including the ownership of all copyrights, patents, trademarks and all other intellectual property rights subsisting in the foregoing, and all adaptations to and modifications of the foregoing shall at all times remain with CMU. CMU retains all rights not expressly licensed under this Agreement.
The CMU Software, including any images, graphics, photographs, animation, video, audio, music and text incorporated therein is owned by CMU or its suppliers and is protected by United States copyright laws and international treaty provisions. Except as otherwise expressly provided in this Agreement, the copying, reproduction, distribution or preparation of derivative works of the CMU Software is strictly prohibited by such laws and treaty provisions. Nothing in this Agreement constitutes a waiver of CMU's rights under United States copyright law.
This Agreement and your rights are governed by the laws of the Commonwealth of Pennsylvania. If for any reason a court of competent jurisdiction finds any provision of this Agreement, or portion thereof, to be unenforceable, the remainder of this Agreement shall continue in full force and effect.
THIS LICENSE SHALL TERMINATE AUTOMATICALLY if you fail to comply with the terms of this Agreement.
PROVISION OF EVALUATION
You expressly agree to provide feedback as to the usefulness, performance, applicability, and any perceived benefits or drawbacks of the CMU Software, while evaluating the CMU Software for the purposes of paragraph (1), above. You expressly acknowledge and agree that providing such feedback will not obligate CMU to respond, provide features, updates, or new releases, as a consequence.
PROVISION OF EXPERIMENTAL PARTICIPATION
The CMU Software is being provided to you free of charge in the interests of advancing the state of the art in network-based distributed information technologies. On occasion, and throughout the duration of this license, you acknowledge and agree that you may be requested to load and run CMU Software for the purposes of executing network-based experiments.
DISCLAIMER OF WARRANTY ON CMU SOFTWARE
You expressly acknowledge and agree that your use of the CMU Software is at
your sole risk.
THE CMU SOFTWARE IS PROVIDED "AS IS" AND WITHOUT WARRANTY OF ANY KIND, AND CMU EXPRESSLY DISCLAIMS ALL WARRANTIES, EXPRESSED OR IMPLIED, INCLUDING, BUT NOT LIMITED TO, THE IMPLIED WARRANTIES OF MERCHANTABILITY, FITNESS FOR A PARTICULAR PURPOSE AND NON-INFRINGEMENT OF THIRD PARTY RIGHTS. THE ENTIRE RISK AS TO THE QUALITY AND PERFORMANCE OF THE CMU SOFTWARE IS BORNE BY YOU. THIS DISCLAIMER OF WARRANTIES, REMEDIES AND LIABILITY ARE FUNDAMENTAL ELEMENTS OF THE BASIS OF THE AGREEMENT BETWEEN CMU AND YOU. CMU WOULD NOT BE ABLE TO PROVIDE THE CMU SOFTWARE WITHOUT SUCH LIMITATIONS.
LIMITATION OF LIABILITY
THE CMU SOFTWARE IS BEING PROVIDED TO YOU FREE OF CHARGE. UNDER NO CIRCUMSTANCES, INCLUDING NEGLIGENCE, SHALL CMU BE LIABLE UNDER ANY THEORY OR FOR ANY DAMAGES INCLUDING WITHOUT LIMITATION, DIRECT, INDIRECT, GENERAL, SPECIAL, CONSEQUENTIAL, INCIDENTAL, EXEMPLARY OR OTHER DAMAGES ARISING OUT OF THE USE OF OR INABILITY TO USE THE CMU SOFTWARE OR OTHERWISE RELATING TO THIS AGREEMENT (INCLUDING, WITHOUT LIMITATION, DAMAGES FOR LOSS OF BUSINESS PROFITS, BUSINESS INTERRUPTION, LOSS OF BUSINESS INFORMATION OR ANY OTHER PECUNIARY LOSS), EVEN IF CMU HAS BEEN ADVISED OF THE POSSIBILITY OF SUCH DAMAGES. SOME JURISDICTIONS DO NOT ALLOW THE EXCLUSION OR LIMITATION OF INCIDENTAL OR CONSEQUENTIAL DAMAGES SO THIS LIMITATION MAY NOT APPLY TO YOU.
ADDITIONAL PROVISIONS YOU SHOULD BE AWARE OF
This Agreement constitutes the entire agreement between you and CMU regarding the CMU Software and supersedes any prior representations, understandings and agreements, either oral or written. No amendment to or modification of this Agreement will be binding unless in writing and signed by CMU.
U.S. GOVERNMENT RESTRICTED RIGHTS
If the CMU Software or any accompanying documentation is used or acquired by or on behalf of any unit, division or agency of the United States Government, this provision applies. The CMU Software and any accompanying documentation is provided with RESTRICTED RIGHTS. The use, modification, reproduction, release, display, duplication or disclosure thereof by or on behalf of any unit, division or agency of the Government is subject to the restrictions set forth in subdivision (c)(1) of the Commercial Computer Software-Restricted Rights clause at 48 CFR 52.227-19 and the restrictions set forth in the Rights in Technical Data-Non-Commercial Items clause set forth in 48 CFR 252.227-7013. The contractor/manufacturer of the CMU Software and accompanying documentation is Carnegie Mellon University, 5000 Forbes Avenue, Pittsburgh, Pennsylvania 15213, U.S.A.
[1] We define an Agent as an autonomous, (preferably) intelligent, communicative, collaborative, adaptive computational entity. Here, intelligence is the ability to infer and execute needed actions, and seek and incorporate relevant information, given certain goals.
[2] See, for example, Julian Dibbell and Lisa Granatstein, “Smart Magic Intelligent Agents Are Changing Cyberspace for Good” in Time Magazine, June 24, 1996; John Carey, “Smart Manufacturing: Agents of Change on the Factory Floor,” in Business Week, August 7, 2000; Jon Sidener, “Intelligent Agents Getting Practical: From Laboratory Curiosity to Practical Application,” The Arizona Republic, March 27, 2001; Stephanie Franken, “CMU Robotics Institute developing communication tools for cars that can warn of traffic jams and map out alternative routes,” the Pittsburgh Post-Gazette, May 27, 2001; the Associated Press article by technology writer Jim Crane, which appeared in numerous newspapers and internet news sources, including USA Today, “AI: Latest foot soldier in war on terror,” October 2, 2001.
[3] Several agent tool kits are available. See Sycara, Paolucci, van Velsen and Giampapa, “The RETSINA MAS Infrastructure,” JAAMS, forthcoming, 2002 (available online athttp://www.cs.cmu.edu/~softagents/papers/AAMAS.pdf). The complete list of publications of the Intelligent Software Agents Lab is available at http://www.cs.cmu.edu/~softagents/publications.html. Most papers are accessible electronically.
[4] For a description of the RETSINA Multi-Agent Infrastructure and its implications for agent infrastructure, see in particular, ibid.
[5] ANS is an acronym for Agent Name Server. For
detailed information about the Agent Name Server, go to the document entitled
“ANS Version 2.8” (file name
javaANS.PDF in: RETSINA/documentation/Java ANS Manual, or online at http://www.cs.cmu.edu/~softagents/ans/ANSv2.9.PDF.
[6] We consider the ANS server and ANS client as part of an Agent Name Service (ANS) package. “ANS”, when used alone, refers to the Agent Name Service as a whole, whereas we use ANS server or ANS client to refer to these components of ANS.