|
Rapid Design through Virtual and Physical Prototyping |
 | |
|
| |||
Fixing a Scanned ImageThis handout takes you through the steps of fixing up a scanned image for the web. I have learned all this on my own, so if you have had a course in image editing and want to give me some hints, I would like to have them. I started by scanning in a sketch that I did on a piece of lined paper. I cropped it a little in the preview window of the scanner, but I forgot to pay attention to the resolution. In the screen dump below, I have opened the scanned image in Photoshop and selected Image -> Image Size. If you click on the image below, you will see what the original image looks like. You can save the linked image if you want to do the steps of the lab following this handout.
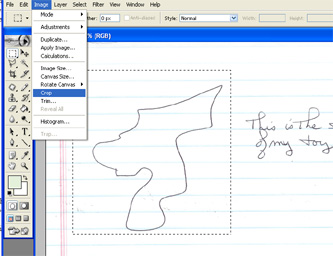
This image is almost 700 pixels wide and the resolution is 200 pixels/inch. Eventually, I want to get it to be 72 pixels/inch and about 5" (or less) wide, but I am going to work with it at full resolution for most of this lab since that gives me more control. First, I am going to crop the image to just the sketch. I am going to crop out the words and crop the borders that I don't need. With the Marquee Tool selected (the rectangle in the upper left of the floating tool bar), use the mouse to select the area you want keep. Then select Image -> Crop:
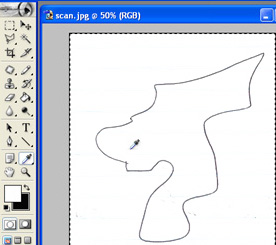
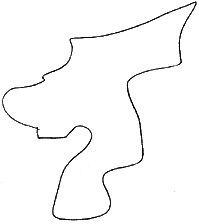
Now, the sketch looks like:
To get rid of the blue lines in the background, I am going to replace blue by white. I selected Image -> Adjustments -> Replace Color:
In the Replace Color window, I selected the eyedropper with the + (add to sample). I used the eyedropper to select all the different colors of blue that I found in the image. You can do just one blue color at a time, but since there are so many shades in the scan, I just selected as many as I could. If you miss a few, you can repeat the procedure.
Once all the blues were all selected, I slid the lightness slider all the way to the right. This makes all the blues as light as possible:
To see how replace color works, move the sliders for hue, saturation, and lightness to see how the image changes. If you make a total mess, you can cancel. Otherwise, click save. (Save just confirms the changes to the image. If you want to save the file, type ^s or File -> Save.) The scan still has a few blotches, which is sometimes call dust or noise. To get rid of this, I selected the blotches and deleted them. However, before I doing this, I made sure that my background color was the same as the background of the image. In the screen dump below, I used the eyedropper tool to select the background color of the scan. Any color you select with the eyedropper tool becomes the foreground color in the palate. Click on a couple of different colors to see how this works.
However, my plan was to delete all the little blotches and anything that is deleted is replaced by the background color. So I switched the background and the foreground color by click on the curved arrow between them:
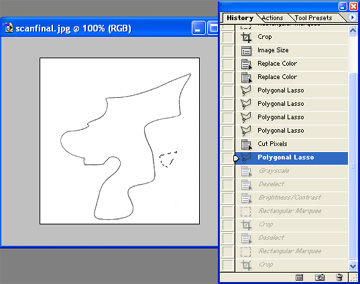
Now, I am going to use the polygonal lasso tool to select the blotches that are still in the file. By holding down the shift key, I can continue to select new areas. To make the polygons, keep clicking the mouse and you surround the stuff that needs to be deleted. To close a polygon, press the enter key.
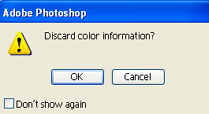
After I selected the areas, I typed ^x (Edit -> Cut). The selected areas were replaced by the background color. Now, my scan looked reasonably clean. Since the image was just black and white, I then changed it from a colored image to a grayscale image. This can reduce the size of an image file dramatically (but you can only do this for images that are OK in black and white.) Select Image -> Mode -> Grayscale:
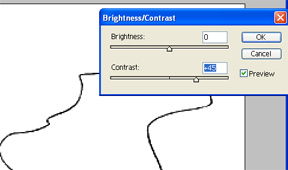
I clicked OK to discard the color information. For this image, the size of the grayscale file was about half the size of the color file. It stilled look the same. If you still have some noise in your image, another method to get rid of it is to change the contrast. Increasing the contrast will make the light colors lighter and the dark colors darker. Select Image -> Adjustments -> Brightness/Contrast.
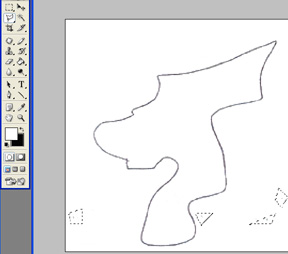
I cropped the image again so the sketch reached to the edge of the image:
Finally, I changed the resolution of the image from 200 pixels per inch to 72 pixels per inch by selecting Image -> Image Size:
Here is the final file:
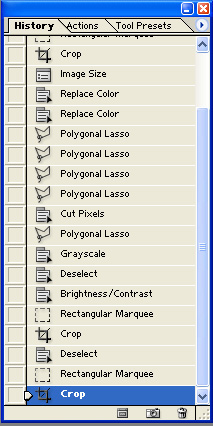
The initial scan was 178kb; the final image was 20kb. One useful window in Photoshop is the history window. Select Window -> History. You will get a list of all the actions you have performed on the file.
By clicking on a step in the history, you can revert to a previous step.
Knowing about the history window can be quite useful when you are learning Photoshop. Rather than having to quit without saving when you make a mess, you can just go back in time to when you image looked OK.
|